
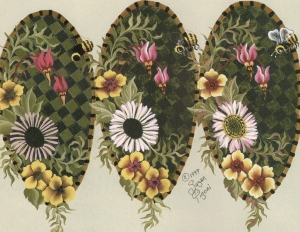
Wildflower Vanity Set. Painted in vibrant colors, this wonderfully detailed vanity set will transform you to a summer meadow abuzz with honeybees!
Materials
Palette
- DecoArt Americana Acrylics Alizarin Crimson (AC)
- Antique Green (AG)
- Black Plum (BP)
- Eggshell (EG)
- French Mauve (FM)
- Lamp Black (BLK)
- Midnite Green (MG)
- Peach Sherbet (PS)
- Peony Pink (PP)
- Pink Chiffon (PC)
- Primary Yellow (PY)
- Reindeer Moss Green (RMG)
- Taffy Cream (TC)
- Tangerine (TA)
- Whitewash (WW)
- DecoArt Dazzling Metallics Emperor’s Gold (EMG)
Brushes
Royal Brush Mfg.
•Series 150 Nos. 2, 4, 6, and 8 shader
•Series 585 No. 1 script liner
•Series 595 Nos. 1 and 2 liner
Langnickel
•Series 393 deerfoot stippler
Other Supplies
•Allen’s Wood Crafts oval mirror and vanity tray
•Houston Art Super Film
•Tack cloth
•DecoArt Matte Sealer/Finisher
•Api’s The Ultimate Tacky Glue
•Tracing paper
•Pencil
•Transfer paper
•Double-ended stylus
•DecoArt Faux Glazing Medium
•DecoArt Easy Float
•Palette
•Paper towels
•Water basin
•White chalk pencil
•Plastic wrap
•DecoArt Dura Clear Varnish
Preparation
1. Sand the tray and mirror frame with Super Film and wipe with the tack cloth to remove dust. Apply sealer/ finisher following manufacturer’s instructions and let dry.
2. Basecoat both sides of mirror frame (excluding rim right next to mirror and concave routed edge) and entire top of tray with three coats of EG—allow drying time and sand with Super Film between the first and second coat, but do not sand between the second and third coat. Basecoat sides and bottom of tray in the same manner with AG. Paint the rim next to the mirror EMG, then stripe as shown in the color photo with BLK. If desired, glue the mirror into the frame at this time as finishing could build up and prevent the mirror from setting in easily later on. Base the concave routed edge of the mirror frame PS, then stripe with FM. Paint the outside routed edge going all the way around the mirror frame AG and allow to dry.
3. Apply another coat of AG to bottom of tray and, while still wet, slip slap a small amount of MG randomly onto this area. Stipple with a crumpled piece of plastic wrap and let dry. Note: The side edges are left plain AG.
Painting
Note: Read through all directions thoroughly before proceeding. Refer to the color photo and color worksheet as you paint.
When transferring patterns to the surface, transfer the least amount of detail as necessary. For example, transfer only the main pattern lines for the ferns and daisy petals. This keeps your strokes smoother and you will not have to be concerned with covering all the transfer lines.
 Add a few drops of Easy Float to your water supply following manufacturer’s instructions. All shading and highlighting is built up in layers using a brush that is only slightly damp. Use the largest brush possible for a given area. Dip the brush into your water supply and blot on a dry paper towel to remove excess moisture. Pick up a small amount of color on one corner of the brush and blend out, scrubbing slightly. If the color seems to cover the area too heavily, you have picked up too much paint. Repeat this process until desired blending is achieved. The first layer may seem choppy, but the color will smooth out with repeated applications. Be sure to allow the paint to dry between applications or you could lift a wet area, creating a “bald” spot. (You may find it easiest to work from area to area, allowing the paint to dry between layers). The brush can also be double-loaded with a small amount of base color to soften the blending. When adding additional colors for shading and highlighting, cover a smaller area than was covered with the previous color.
A wash of color is a tint applied after the main painting is complete. Pick up a small amount of faux glazing medium on your brush, blot on a paper towel, then pick up a small amount of color and tint where desired.
1. Either pencil in a 1″ border around the inside of the tray or transfer the oval from the pattern provided centered on the tray. Transfer oval from pattern to back of mirror frame. Basecoat inside of oval on mirror frame and outside of
oval on tray MG. Divide marked border of tray into thirds and mark off checks using the chalk pencil. Paint these checks AG. Use the chalk pencil to mark off checks on back of mirror frame (inside oval) as shown on the pattern and paint AG. Allow to dry. Stipple faux glazing medium + MG (3:1) over the checks using the deerfoot stippler. Allow to dry.
2. Band the edge of the ovals on both pieces with EMG and stripe with BLK.
3. Basecoat convex routed edge around inside of tray PS, then stripe with FM in the same manner as for the routed edge of the mirror frame.
4. Add ferns around outer side edges of tray and outside routed edge of mirror frame with RMG, picking up a bit of AG now and then. Use the script liner to wiggle the brush to form a center line for each fern. Add “fingers” of fern in the same manner. The fern design should be continued completely around these areas on both pieces.
5. Trace patterns onto tracing paper and transfer onto tray and back of mirror frame using transfer paper and the stylus. Transfer daisy design onto handle front under mirror as well.
6. Dot flat area around outer edge of tray and outer edges of mirror with the stylus and AG.
7. Long grass. Pull out the long grass using the script liner and AG. Randomly pick up and apply RMG to highlight.
8. Ferns. Use the script liner to base in the main line of each fern with AG. Randomly pick up AG and RMG with the liner to add fingers to ferns, wiggling the brush out to form each finger. Ferns laying over other ferns or grass should be lighter in value by adding more RMG.
9. Leaves. Basecoat AG and highlight with RMG. Add veins with comma strokes of RMG.
10. Shooting star flowers. Basecoat stems AC and highlight with PR Apply petals with PP and shade with AC. Highlight petals with PC. Basecoat the stamen (beak-like part of flower) TA and add markings with BP. Highlight at top with TC.
11. Coreopsis. Basecoat these flowers PY and shade with BP. Repeat shading with AC, then highlight with TC. Line as indicated on pattern with TC. Paint center petals BP and highlight with PP. Let dry, then repaint center petals with AC. Use end of brush handle to dot flower centers with BP. Let dry, then highlight top of center with PP.
12. Robin’s plantain (daisy flower). Use the No. 1 liner to stroke on the base petals with FM. Allow to dry, then add top petals with PC. Pull TC out from flower center so color fades off on petals. Paint flower centers MG. Use small end of stylus to dot the center with AG, then use large end of stylus to place dots of AG + RMG (1:1) around AG dots. Stipple PY around larger dots using the No. 1 liner, leave a bit of space, then stipple again with TA.
13. Wash tints of PP on edges of Robin’s plantain flowers and randomly on ferns.
14. Bees. Basecoat each bee with BLK and PY as shown on the worksheet. Shade bottom of back with BP, then stripe with BLK. Highlight middle of body and eye with WW, then dot eye with WW. Pull out legs with BLK and, while wet, highlight with WW. Apply wings with a transparent wash of WW—color should be more intense at outer edges. Lightly line wings with BLK. Antennae are WW on the mirror and BLK on the tray.
Finishing
Varnish the mirror frame and tray following manufacturer’s instructions, allowing adequate drying time between applications.
I see that the project mentions referring to a pattern, but I don’t see where to download the actual pattern. Am I missing something? Thank you for proving these projects. I’m glad I found you.