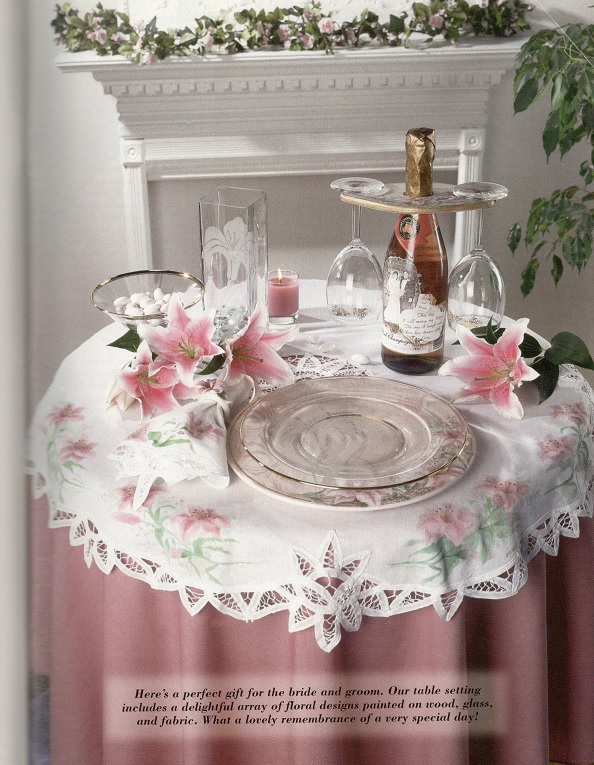
Here`s a perfect gift for the bride and groom. Our table setting includes a delightful array of floral designs painted on wood, glass and fabric. What a lovely remembrance of a very special day!
Materials
Palette

- Delta Ceramcoat Acrylics Cadet Blue (CB)
- Chocolate Cherry (CC)
- Fruit Punch (FP)
- Pink Parfait (PP)
- Seashell White (SW)
- Spring Green (SG)
- Delta PermEnamel Paints 14K Gold (14KG)
- Delta Starlite Shimmering Fabric Colors Brown (BR)
- Leaf Green (LG)
- Peppermint (PE)
- Red (RE)
- Starlite White (STW)
Brushes
Robert Simmons
•Series T51 No. 1 liner
•Series T57 1/4″ angle shader
•Series T60 No. 6 flat shader
•Series T67 No. 6 filbert
•Series 431B No. 6 flat shader
•Series 431L No. 6 liner Soft mop
Other Supplies
•Walnut Hollow wooden charger plate
•Crisa glass plate, wine goblets and vase*
•Positively Country wooden wine caddy
•Accent Design heart box
•Tablecloth, napkin, and napkin ring of choice
•Wine or champagne bottle
•Delta Ceramcoat Pearl Luster
•Loew-Cornell Graining Tool
•Delta PermEnamel Surface Cleaner & Conditioner
•Delta Wood Sealer
•Sandpaper
•Soft cloth
•Tracing paper
•Pencil
•Worn graphite paper or light transfer paper
•Stylus
•Stencil adhesive spray
•Clear page protector
•Delta PermEnamel White Frost Kit
•Delta SoftTints Garden Colors Kit
•Delta Stencil Magic Garden Stencil
•Delta Gilded Accents in Florentine and Gilded Sayings
•Delta Gel Blending Medium
•Palette
•Black and white copies of wedding photographs, invitation, and other wedding mementos
•Delta Satin Decoupage Medium
•Soft cosmetic applicator sponge
•Delta Fabric Gel
•Delta SoftTints Matte Finish
•Delta Matte Spray
•Available at most local craft or home supply stores.
Preparation
Charger and wine caddy
1.Sand both pieces and wipe with a soft cloth to remove dust. Seal following manufacturer’s instructions and let dr)’. Basecoat both surfaces with two coats of SW, allowing adequate drying time between applications.
2.Mix one to two drops of PP and FP into a half-dollar size puddle of Pearl Luster and brush this mix over the basecoated surface. Pull the graining tool across the wet surface, rocking the tool as you pull. Once the entire surface is grained, lightly brush over the area with a soft mop, following the direction of the grain. Allow to dry.
3.Trace the pattern onto tracing paper and transfer onto the edge of the charger and onto the wine caddy using worn graphite paper or light transfer paper and the stylus.
Glass plate and vase
Wash each surface thoroughly with soap and water, then rinse well and dry.
Brush Surface Cleaner & Conditioner onto each piece and let dry.
Wine bottle and goblets
1.Wash and dry the goblets and bottle thoroughly. Apply matte spray to the bottle and allow to dry.
2.Cut or tear the copied wedding mementos into shapes and sizes to fit your bottle.
Tablecloth and napkin
Make a dark line copy of the pattern and insert into a clear page protector. Spray the front side of the page protector with stencil adhesive, then lay the fabric piece over top. This will keep the pattern in place as you paint and allow for easy repositioning. This also eliminates the need to transfer the design onto the fabric.
Painting
Charger and wine caddy
Note: Mix PP + FP (1:1) to use for the main color (MC).
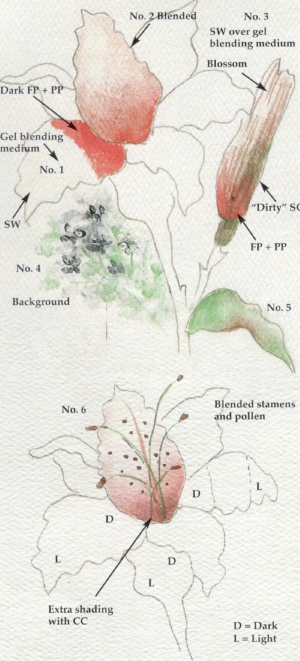
1.Petals. Working one petal at a time, apply gel blending medium. Referring to the color worksheet, place SW on the outside edge of the petal and MC at the base (No. 1 on worksheet). Leave a blank area of only gel blending medium between the colors. Use the filbert to blend the colors together with a soft, patting motion, wiping the brush often. Additional shading can be added while the surface is still wet. Pat the color in and blend (No. 2 on worksheet).
2.Blossoms. Undercoat with gel blending medium. Basecoat the blossom with SW. While still wet, add MC at the base and use the dirty brush to apply SG on the underside. Blend (No. 3 on worksheet). Use the tip of the liner and CB + SW to add baby’s breath and small blue flowers (No. 4 on worksheet). Use SG to paint the stems and leaves (No. 5 on worksheet).
3.Stamens and pollen dots. Use the liner and CC to pull thin lines from the center of the flower up toward the top. At the end of each line, place an elongated dot of FP + CC by laying the tip of the brush down, pressing, and lifting (No. 6 on worksheet). Apply the pollen dots with the liner and FP.
4.Paint a narrow band of 14KG around the outside edge of both thecharger and wine caddy. Glass plate and vase Spray the back of the garden stencil with stencil adhesive. Position the stencil (only the lily is used) on the plate. Following manufacturer’s instructions, sponge White Frost from the kit across the stencil opening onto the surface. Allow to dry, remove the stencil, then repeat for the vase.
Wine bottle and goblets
1. Following manufacturer’s instructions, coat the entire bottle with satin decoupage medium. Place the paper pieces on the wet surface as desired, gently pressing out any air bubble and making sure that the edges are secure. Allow to dry.
2. Apply a coat of matte finish over the paper surfaces only. Apply paints from the Garden Colors Kit to the photos as desired to add a gentle touch of color. (Tint O Podge method: Wet the brush and blot to remove excess. Pick up a tiny touch of a Garden Color and work into the brush. Apply as desired. For stronger color, allow to dry, then repeat. Do not use a lot of paint here.)
Tablecloth and napkin
Note: Use the Fabric Colors and fabric brushes for these pieces.
1.Petals. Working one petal at a time, apply fabric gel to the area. Place PE + (RE) at the base of the petal and STW at the edge. Gently pull the darker color up and the white down. If necessary, add more shading with a small amount of BR. Refer to the color photo for placement of the darker color.
2.Stems and stamens. Using the liner, pull thin stems up from the center and add the stamens with BR. Use the tip of the liner and the same color to apply the pollen dots.
3.Foliage. The background foliage is applied with thinned paint. Load the brush with thinned LG, blot, then touch to the fabric, allowing the color to bleed out a bit. Add more thinned LG to create a mottled look. When dry, define the leaves and any background flowers with colors from your palette (these colors should not be thinned).
Heart box
1.Mix PP + FP (1:1) with some water and Pearl Luster. Brush a thin coat of this mix over the entire box. Wipe off excess with a cloth or paper towel. Allow to dry.
2.Following manufacturer’s instructions, apply Gilded Accents Saying “I Love You” to the box.
Finishing
Wine bottle and goblets
1.Apply matte spray to the bottle and allow to dry. Following manufacturer’s instructions, add the Florentine Gilded Accents to the bottle and goblets as desired.
2.Apply one to two coats of satin decoupage medium to the bottle only and let dry.

Leave a Comment