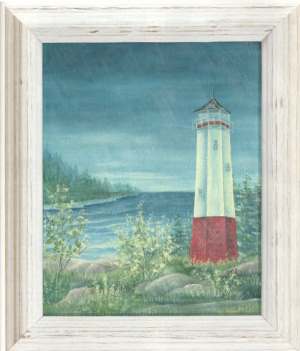
Creating a mood in a painting can be easily done by choice of weather, time of day, or season. In the case of this painting, the time of day is evening and the weather is rainy.
Materials

-
Stretched canvas or surface with similar measurements (8″ x 10”)
-
DecoArt Americana Acrylics: Avocado Dip, Black Plum, Blue Haze, Burnt Orange, Buttermilk, Cadmium Red, Charcoal Grey, Colonial Green, Heritage Brick, Lamp Black, Lemonade, Midnite Blue, Plantation Pine, Snow White, Spa Blue.
-
Dynasty Black Gold #1 liner (Series 206L); #2 round (Series 206R); #4 and #12 shader (Series 206S); 3/4″ Wave angle (Series 206WVA)
-
DecoArt Faux Glazing Medium
-
Miscellaneous: chalk, gesso, paper towels, stylus, tracing paper, transfer paper, spray bottle with water (optional)
Preparation
Note: Follow all manufacturers’ label instructions for proper product usage.
-
If canvas is not pre-primed, prime with gesso or Snow White acrylic paint. If using stretched canvas, which has bounce, brush on a coat of clean water or spray lightly, and let dry; this will make the canvas tauter.
-
Transfer pattern onto tracing paper. Transfer elements as needed.
Painting
Note: Refer to the Color Worksheet on page 52 as you work.
-
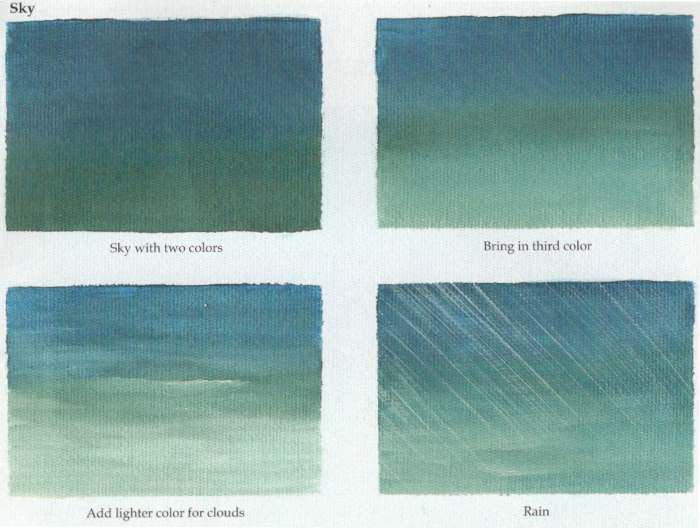
Sky. Load the Wave angle brush with Midnite Blue and begin applying color to the top of the sky, pulling the brush on the chisel edge. Without rinsing the brush, pick up Blue Haze on the side edge that is going to face the horizon. If needed, load the other side with Midnite Blue and apply as a double-load. Continue working downward using short, choppy strokes and a slight patting motion to blend colors. Keep the brush edge horizontal, but move the handle up and down to keep paint colors blended; pick up more paint as needed. Use more pressure when applying colors and soften your touch to lightly blend colors together.
Wipe brush on a paper towel, and then pick up Buttermilk. Keep the brush horizontal and move up and down to create clouds in the sky, picking up paint as needed. Lighten the horizon by picking up more Buttermilk and applying to the bottom of the sky, working the color upward slightly into the blue colors.
Many color variations can be created for the sky using this blending technique. Double-loading or touching the edge of the brush in water and blotting on a paper towel will often work to keep surface paint easier to move.
-
Sea. Double-load the Wave angle with Midnite Blue and Blue Haze, and begin applying color to the sea along the horizon. Without rinsing the brush, touch a side edge in Buttermilk and apply toward the coast, using short, choppy strokes. Pick up additional Buttermilk on the brush toe and use a light touch to highlight waves.
-
Distant trees. Mix Faux Glazing Medium with Blue Haze, and pull up distant trees using the tips of the Wave angle. Touch the brush in Plantation Pine and pull up deeper-colored trees in front. Without rinsing the brush, touch the brush toe sparingly in Buttermilk and blend in to create land in front of the trees. Double-load the brush toe with Blue Haze and Buttermilk, and pull the brush upward to create a rocky coast. When the paint is dry, touch the brush toe in Midnite Blue and shade along the bottom of the rocks.

-
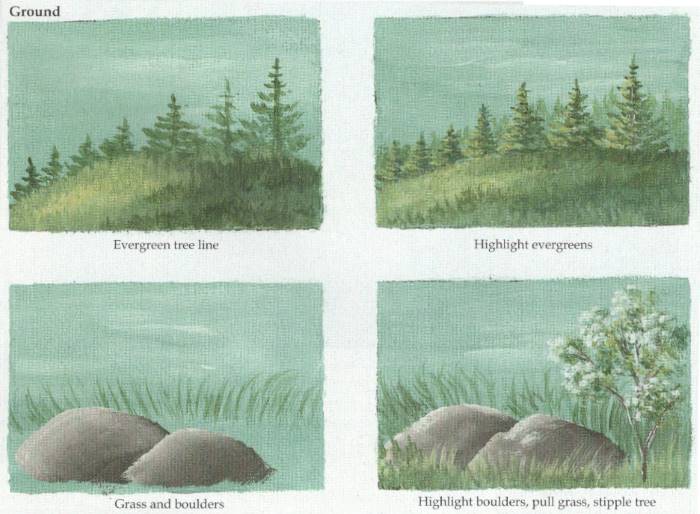
Tree line. Create evergreens behind the lighthouse with a double-load of Blue Haze and Plantation Pine using the toe of the Wave angle. Double-load the brush toe corner with Charcoal Grey and Buttermilk, and pull up lines for tree trunks. Load the toe of the Wave angle brush with Colonial Green, and stipple lightly to highlight left side of pine trees. Repeat with Spa Blue to brighten highlights.
-
Lighthouse. Use the #12 shader to apply Heritage Brick to lighthouse base. Use the #4 shader to horizontally pull short, irregular strokes of Black Plum to shade the lighthouse base. In the same manner, highlight lighthouse base with Cadmium Red. Add a little Burnt Orange to lighten the Cadmium Red, and highlight the side edges of the brick sections.
Base lighthouse top with a doubleload of Blue Haze and Buttermilk using the #12 shader. Apply color to each section of the lighthouse top, keeping Buttermilk (reflecting light) to the side edge.
Use the #4 shader to base windows with Blue Haze + Faux Glazing Medium. Double-load the tip of the #1 liner with Blue Haze and Buttermilk, and apply the window frame.
-
Beacon. Mix Buttermilk + Faux Glazing Medium, and apply to the beacon using the #12 shader. Let dry. Add the rim at the base with a doubleload of Black Plum and Cadmium Red using the #2 round. Double-load the tip of the round brush with Blue Haze and Buttermilk to apply railings. Base roof Lamp Black using the #2 round. While still wet, touch the tip of the brush in Buttermilk and blend in highlights. Line lightening rod on the roof with a double-load of Lamp Black and Buttermilk.
-
Boulders. Load the toe of the Wave angle with Buttermilk and the heel with Charcoal Grey. Use the brush on the chisel edge to create boulders, blending the colors by applying pressure to the bristle edge. Use the tips of the Wave angle and a deep green mix of Midnite Blue + Plantation Pine to pull up grass in front of each boulder. Highlight grass with Avocado Dip. Continue to create boulders in the foreground and pull up grass around each one.
-
Shrubbery. Double-load the #2 round with Charcoal Grey and Buttermilk, and apply shrubbery bark and limbs. When dry, use the toe of the Wave angle brush to sparingly stipple greenery with Plantation Pine. Stipple with just a little Lemonade (more can always be added). In the same manner and with the same colors, stipple the grass in front of the foreground boulders.
-
Rain. Mix a small amount of Buttermilk with Faux Glazing Medium. Use the tips of the Wave angle chisel edge to pull rain streaks. Allow the tips to barely touch the surface, keeping the rain light. If desired, try a few practice strokes on scrap paper first.
Check out our other fun and interesting painting projects
Get the Most from a Brush:
Featuring the Black Gold Wave Angle Brush
The Black Gold Wave angle brush is quite versatile for landscape painting. When the brush is new, the chisel edge is sharp, so more pressure is needed to open the bristles for blending and filling larger areas, such as the sky and areas of water. The brush can be loaded either with a color on each side of the bristles or one color on the brush toe (longer bristles) and a second color on the brush heel (shorter bristles); both offer variety in final results after blending.
Grasses, evergreens, ocean waves, foliage, and rainfall are quickly painted with a Wave angle. Frequently using it for stippling (or not cleaning it well) can “mellow” the edge, making it softer and possibly flaring the bristles slightly. The key is knowing how much pressure to apply and how to use the bristles effectively, so whether a Wave angle brush is new or mellowed out, it will still perform well.

When stippling evergreens, the treetop is very minute; therefore, use just a few bristles of the brush toe, adding more bristles while painting downward to widen boughs. Double-loading the brush toe allows the brush to be used for straight lines with texture, such as the trunk sections of an evergreen or for fence posts. Grains can also be simulated on larger tree trunks and when painting wood structures, such as a barn, a covered bridge, or the siding texture for a house.
Stippling can be applied using the complete edge of the brush for longer pine boughs or large grassy areas. Stippling with the brush toe fills in smaller areas, pulls up grass in front of boulders and buildings, and it’s perfect for impressionistic leafy foliage and flowers. The Wave angle brush is also beneficial for painting roads and paths, as it creates texture which results in more detailed effects. When painting rain showers, it’s necessary for the paint to be moveable and the brush tips should barely touch the surface; pull brush without hesitating to keep the rain lines smooth. To keep paint moveable and translucent, add water to the paint color or mix with glaze.
The Black Gold Wave angle brush is a good choice for painting water, grasses, rain, and foliage using strokework or stippling techniques.
Leave a Comment