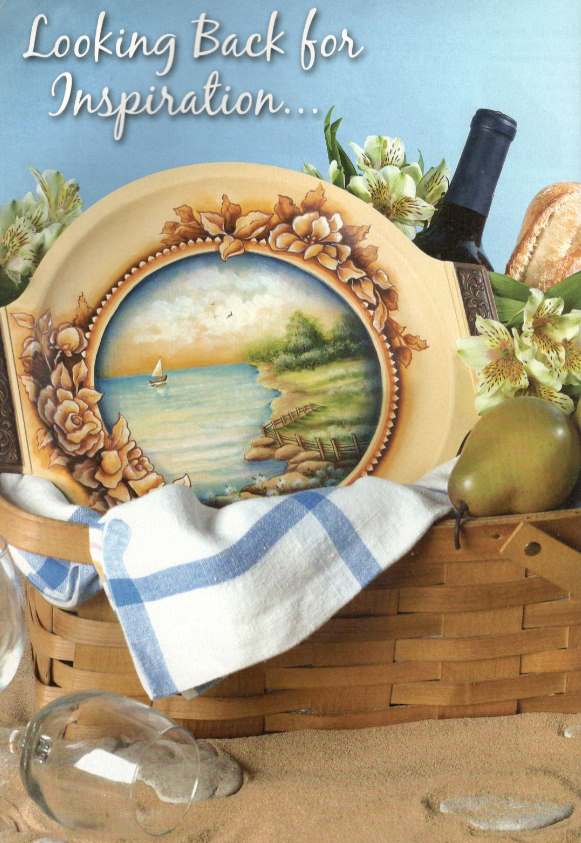
“My acrylic painting is styled after the famous Hudson River Artists. The original oil landscapes dated from the late 1700s to mid-1800s and boasted popular artists sought after then and still today. Known for their rich, dark foregrounds and light, detailed backgrounds, these period artists created a “glowing” quality to their paintings.
Mother Nature, the main subject, was sketched outdoors and brought back to studios for completion. If any manmade structures were included, they were painted smaller than the trees, mountains, streams, rocks, etc. Also people, animals, and birds were portrayed simply, without much detail, and kept tiny in comparison.
Several artists’ homes and studios remain open to visitors in the Hudson River Valley, and I highly recommend including them when visiting New York. I have the pleasure of living in this area and find constant inspiration from the Hudson River, Catskill Mountains, and surrounding views. I hope you enjoy this style of landscape painting and find it an enjoyable trip back to a gentler time.”
Materials
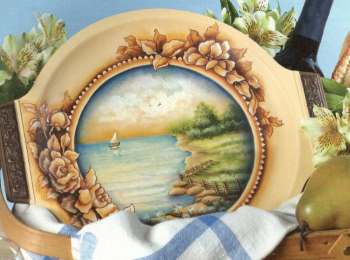
- Metal or wood surface of choice
- DecoArt Americana Acrylics:
Black Plum, Blue Mist, Burnt Sienna, Burnt Umber, Buttermilk, Evergreen, Hi-Lite Flesh, jade Green, Midnite Blue, Plantation Pine, Raw Sienna, Raw Umber, Sable Brown, True Ochre, Yellow Ochre - DecoArt Dazzling Metalics:
Metallic Pearl, Metallic, Rich Espresso - Sharon B’s 1/4″ Crown, 1/4″ Blade, #1 liner, #3 and #5 round, 1″ flat wash, #6 and #8 flat
- DecoArt Multi-Purpose Sealer; DuraClear Matte Varnish
- Miscellaneous:
cotton swabs, hair dryer, eraser, extrafine-grit sandpaper, film canister, gray graphite paper, palette paper, paper towels, two water containers*, pen, pencil, silver polish, soap, soft cloth, 1″ sponge brush, stylus, tracing paper, white vinegar
*Two water containers are needed—one to rinse brushes and one for clean water applications.
Preparation
Note: Follow all manufacturers’ label instructions for proper product usage.
-
Working on a metal surface. When deciding on a surface, consider metal. It is very easy to find trays and plates at antique shops, and rummage sales, and maybe in Grandma’s trunk. Usually the surface is silver plated and tarnished. As long as there are no rust pits or other deep abrasions, it is easy to prepare the surface for painting.
Start with a good bath of soap and water, followed by removal of any tarnish using a silver polish. Wash again, and then rinse in white vinegar + water to remove all traces of soap and chemicals. Dry overnight.
Create a Pale Yellow base mix of Buttermilk + Yellow Ochre (2:1). To seal the surface, apply Multi-Purpose Sealer + Pale Yellow (1:1) to the painting area.
Basecoat the painting area with Pale Yellow mix using the 1″ flat wash brush or a 1″ sponge brush. Stretch the mix in all directions to avoid ridges for a smooth application. Dry and repeat. Do not sand between coats nor allow buildup in creases or raised design areas. Save the remaining mix in a film canister (or other small container with a tight-fitting lid) for use in the landscape painting.
-
Working on a wood surface. Sand, wipe, and apply several coats of Pale Yellow mix in the same manner as for the metal surface. Lightly sand between each coat, using extrafine-grit sandpaper, for a smoother application. This process works well for prepainted surfaces, porcelain, or ceramic.
-
Transfer only the horizon line and shoreline using the stylus and gray graphite paper. Transfer details as needed.
If you are new to the art of painting, you can check our Glossary.
Painting
Note: Refer to the brush diagrams for loading and use of the Crown and Blade brushes. Refer to the Color Worksheet while working on each stage of the painting.
Stage One
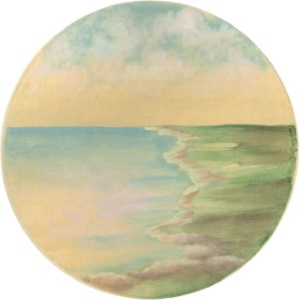
-
Sky. Dampen the sky area with clean water using the 1″ flat wash. While still wet, load the #8 flat with Blue Mist, and starting at the top, walk the color halfway down. Clean the brush, and in the same manner, walk Yellow Ochre up to meet the blue.
-
Clouds. Clouds are best done on a damp surface. While the sky colors are still wet, scumble Hi-Lite Flesh clouds using the Crown brush. Start in the center and work outward. Leave plenty of sky holes between the clouds and vary their shapes.
If the sky has started to dry before applying the clouds, finish drying using a hair dryer, apply clean water, and proceed to scumble the clouds. Scumble a few highlights in the center clouds with Buttermilk.
-
Water. Create the water in the same manner and colors as the sky. While still damp, tap in cloud reflections with Hi-Lite Flesh using the tip of the Crown brush. Lightly drag the #8 flat horizontally across the reflections to blur.
Dry the surface. Use the 1″ flat to dampen the water area with clean water. Sideload the #8 flat with Blue Mist, and apply along the horizon line and edges of the shoreline. Wipe the brush. Lightly drag the brush hori-zontally across the water to blend and soften.
- Shoreline. There is no need to predampen the shoreline. Using the #6 flat and a zigzag motion, apply Pale Yellow mix to the shoreline. While still wet, streak Raw Sienna horizontally on the right edge, pulling into the yellow area in the same manner.
-
Grass. Dampen the grass area with clean water. Pulling horizontally, apply Jade Green along the edge of the shoreline using the #8 flat. Add Evergreen in the same manner, pulling in from the right toward the Jade Green. (This will appear streaky.) While the Evergreen is still wet, add touches of Raw Umber to create darker shadows.
-
Rocks. Transfer the rocks. Use the tip of the Crown brush with Pale Yellow mix to tap and horizontally pull rocks, creating various sizes. Add Raw Sienna shadows to the base of each rock in the same manner. Darken between the rocks with a touch of Raw Umber.
Stage Two
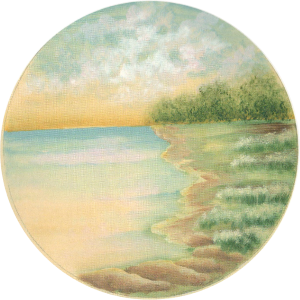
-
Sky. Dampen the sky with clean water. Add more Buttermilk highlights to the center clouds using the Crown brush. Float True Ochre along the top of the horizon line using the #8 flat.
-
Water. Dampen the surface. Scumble Pale Yellow mix and Hi-Lite Flesh in the center and left areas to add more cloud reflections. Soften by pulling the #8 flat horizontally across the reflections. Dry the surface.
-
Rocks and shoreline Sideload the #8 flat with True Ochre to tint the Pale Yellow areas of the rocks and shoreline to warm and darken.
-
Distant trees Dampen the sky area. Use the tip of the Crown brush with Plantation Pine to tap trees, starting at the base along the horizon and tapping upward. Keep the trees very light and delicate. While still wet, tap Evergreen at the base for shadows. Note: It is best to apply these trees freehand using the pattern for size reference.
-
Grasses in the shadow area Tap light, delicate Jade Green highlights in the shadow areas using the high tip of the Blade brush. Use the chisel edge of the Blade brush to add Evergreen grasses by pulling up into the base of the Jade Green application. Note: Load the brush with a small amount of color and tap on the palette to separate the bristles.
Tap Yellow Ochre sunlit areas on the top of the Jade Green highlights using the high tip of the Blade brush. Tap Pale Yellow mix on the left side of the Yellow Ochre application. The grasses get slightly taller as they progress toward the rocks.
Stage Three
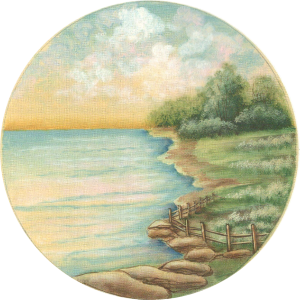
-
Water. Dampen the surface. Use the #1 liner and a broken, horizontal squiggle stroke of Buttermilk to form ripples. Lightly pull the #6 flat horizontally across the ripples to soften. Add darker ripples of Blue Mist. If the surface starts to dry while applying ripples, dry with the hair dryer, dampen with clean water, and proceed with another application.
Note: The ripples get larger as they come forward toward the rocks.
Dampen the water area and add shadows along the edge of the shoreline. Sideload the #8 flat with Blue Mist and apply in a zigzag motion, pulling the color out horizontally into the water. Further darken the larger dips with a small amount of Midnite Blue; soften by pulling out into the water. Add an even smaller amount of Black Plum to darken the deepest shadows.
-
Mid-ground trees and bushes. Create these in the same manner as the distant trees — only larger. Dampen the surface. Tap tree shapes with Plantation Pine using the high tip of the Blade brush. Add Evergreen to the base of the trees. Add Raw Umber to darken the shadows at the base and right sides. Highlight the left edges of the trees with Jade Green. Add sunlight in the Jade Green areas with a touch of Yellow Ochre. Line trunks and branches with Burnt Umber using the #1 liner.
Create the bushes along the base of the trees in the same progression. Tap Jade Green highlights along the tops of the bushes. Apply Yellow Ochre sunlight mainly on the left sides.
-
Rocks. Use the liner and Burnt Umber to detail the rocks at the base and to create separation.
Dampen the rocks. Highlight the tops with a sideload of Pale Yellow mix using the #6 flat. Float shading at the base of the rocks with Burnt Umber. Tuck Burnt Umber shadow? randomly along the shoreline where it meets the grass.
-
Fence. Transfer the fence Line posts and rails with Pale Yellow mix using the liner. Add linework details with Burnt Umber. Add a thin line of Raw Sienna next to the Burnt L line on the right side of each post. Shade the bottom of each post and the left side of each rail with a sideload of Burnt Umber using the #6 flat.
There are long shadows under the smaller, upper portion of the fence where it meets the grass. Sideload Plantation Pine and puli shadows to the right at the base of each post. Darken the shadows at the bottom of each post (not pulling to the right with Evergreen.
Stage Four
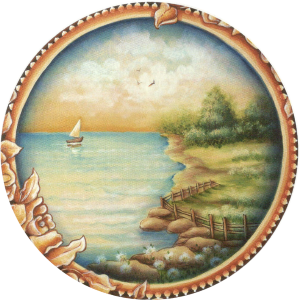
Note: Refer to the photo of the finished painting for this stage.
-
Boat. Transfer the sailboat. Base sail with Yellow Ochre and highlight the left side with Buttermilk using the #3 round. Base boat Raw Sienna and highlight the top with Yellow Ochre. Use the #1 liner to outline and detail the boat with Burnt Umber and the sail with Blue Mist.
-
Water Use the #6 flat brush to dampen the water below the boat. Use the #3 round with Raw Sienna to add a boat-shaped reflection. Use the liner to pull horizontal ripples in the shape of the triangular sail below the boat reflection.
Dry the surface and redampen. Use the liner to apply Blue Mist ripples across the boat reflections, and add a trail of Buttermilk waves under the boat. While the surface is still damp, sideload the #6 flat with Midnite Blue and float along the horizon line to the left of the boat. Walk the color down into the water to fade. Dampen the water above the large foreground rocks, and apply a darker shadow in the same manner.
-
Wild flowers. The flowers in front of the fence and foreground rocks are best created freehand. Use the tip of the Crown brush to tap on small, delicate Hi-Lite Flesh flowers. Make the flowers closer to the fence smaller.
Add tiny highlights of Buttermilk to the left top of each flower and tints of True Ochre to the right base. Add a touch of Raw Sienna on top of the True Ochre to darken.
Fill in with Evergreen stems and tiny one-stroke leaves using the liner. Add tinv dots of green to the centers of the flowers using the tip of the liner. Line Evergreen grasses between the flowers. The wildflowers should look fluffy and lacev like Queen Anne’s lace.
-
Birds. Use the liner with Burnt Umber to create three small birds in the center clouds with simple “V”-shaped strokes in varying sizes and angles.
-
Glazing. Dampen the surface with clean water. Sideload the 1″ flat with Midnite Blue and glaze around the edge of the landscape (on top of the painting). This makes the scene appear concave and acts as a shadow for the overlapping floral border.
Dry the surface, redampen, and applv Black Plum over the first application, making sure not to lose the Midnite Blue. Use Black Plum sparingly for better control.
-
Band. Use the #3 round and Pale Yellow mix to cover any smudges.
Dampen the band area. Shade the outside edge of the band around the scene with a sideload of Raw Sienna using the #6 flat. In the same manner, apply the second value with Raw Sienna + Burnt Sienna (2:1), using less paint so the first color remains visible. This shading will be the area where the “pearls” are painted.
Stage Five
-
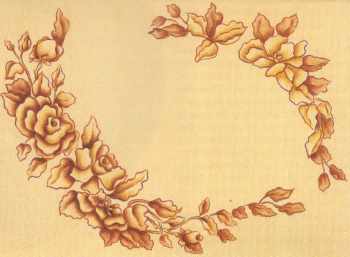
Background. Transfer the floral design. Use a round brush and Pale Yellow mix to fill in any overlapping parts of the design on top of the band and landscape. Use the liner and thinned Burnt Sienna to line over the transfer lines. Dry. Erase all visible pattern lines.
Dampen the surface. Sideload the #8 flat with True Ochre, shade next to the band where there are no floral elements, and walk color out to fade. Dry, redampen, and repeat the shading process with Raw Sienna, and then darken with Raw Sienna + Burnt Sienna. Paint over the band’s transfer line with Burnt Sienna + Raw Umber using the #3 round. This separates the background shading from the band shading.
-
Shadow leaves and background shadows. Shadow leaves are behind the flowers and leaves, and they are applied first. Use the #3 round and thinned Raw Sienna to create each leaf. Dry. Shade the base of each shadow leaf with a sideload of Raw Sienna + Burnt Sienna using the #6 flat. Detail the shadow leaves with this same color using the liner.
Use the #8 flat with a sideload of Raw Sienna + Burnt Sienna to shade the background around the petals and leaves. Add the darker shadows with a sideload of Burnt Sienna + Raw Umber. Further deepen the shadows with a sideload of Raw Umber.
-
Pearls. Use the handle end of the #3 round and Pale Yellow mix to add dip-dot pearls along the outside edge of the band, placing them on top of the previous band shading. There are no pearls applied where the floral design overlaps the band. Dry well. Use the #3 round with thinned Raw Sienna + Burnt Sienna to place a shadow across the bottom of the pearls, and around any petal or leaf on top of the band. Dry. Add tiny dip-dots of Metallic Pearl to the top of each pearl using the large end of the stylus.
-
Flowers and leaves. Sideload the #6 flat with True Ochre and shade the base of each petal and leaf, leaving the basecoat of Pale Yellow mix as highlights. Continue to build shadows with Raw Sienna, making sure to shade under any overlaps. Apply Raw Sienna + Burnt Sienna (1:1) to further deepen the darkest areas. Apply the fourth dark value of Burnt Sienna + Raw Umber to separate the darkest shadows. Use Raw Umber for any detail linework and tiny shadows.
-
Pearl highlights. Use the #8 flat with a sideload of Metallic Pearl to apply shiny highlights to the outside edges of each petal and leaf, except the shadow leaves. Switch to the #6 flat for smaller applications when necessary Squiggle the brush a little to create ripples and turned edges. Leave plenty of the previous shading colors to separate petals.
When dry, randomly intensify highlights with Metallic Pearl using the liner brush. It is most effective on the edges where the light falls first.
Finishing
-
Basecoat trim and back. Use the 1″ flat wash to apply several coats of varnish on the landscape and floral designs to protect the surface. Dry well. Turn the surface over and basecoat with Sable Brown using the sponge brush. Basecoat any trim areas using the #5 round.
-
Metallic finish. To create a rich metallic finish on the rim, handles, and back of the project, wash over the Sable Brown areas with Metallic Rich Expresso thinned with water (approximately 4 parts water to 1 part paint). If this appears too thin, gradually add more paint. While the wash is very wet, crumple a damp paper towel and tap off excess. This will leave a mottled appearance on the surface. Do not remove from recessed or raised areas of the surface (this will allow details to become more visible). Dry, and reapply to your satisfaction, creating unusual patterns on the surface. Dry.
-
Varnish and enjoy!
Loading the Crown and Blade Brushes
The bristles of the Crown brush are tier shaped, ending with a domed top.
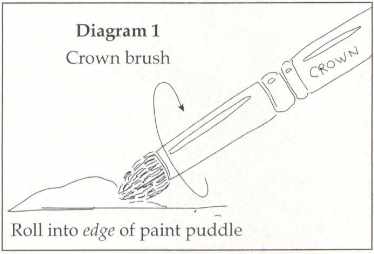
Uses: Roll the bristles of the brush across the edge of the paint puddle to fully load.
-
When painting clouds, roll the paint out of the brush in circular motions, leaving texture on the surface. Now add tints and shadows using only a half-loaded tip, and then blend to soften.
-
Background trees and bushes are tapped onto a damp surface using the loaded brush to keep them soft and muted. Now add tints and shadows using a half-loaded tip with less pressure.
The bristles of the Blade brush are shaped with flat sides, oval-chisel edge, and angle-cut top.
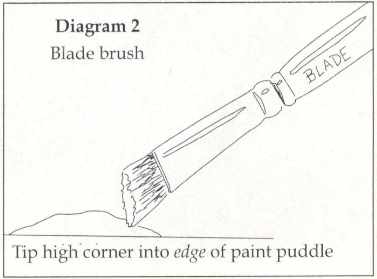
Uses: Tip the high corner into the edge of the paint puddle or drybrush using scant amounts of paint on the oval chisel edge and sides.
-
When painting delicate flowers, load the high corner and tap lightly on the surface. This technique is also used for leaves on trees and bushes.
-
Pine trees are tapped on the surface with the same loading technique, starting at the base and working up the tree.
-
To drybrush grasses or animal fur, load the chisel edge with scant amounts of paint. Apply the paint with light pressure, pulling in the direction of growth.
Leave a Comment