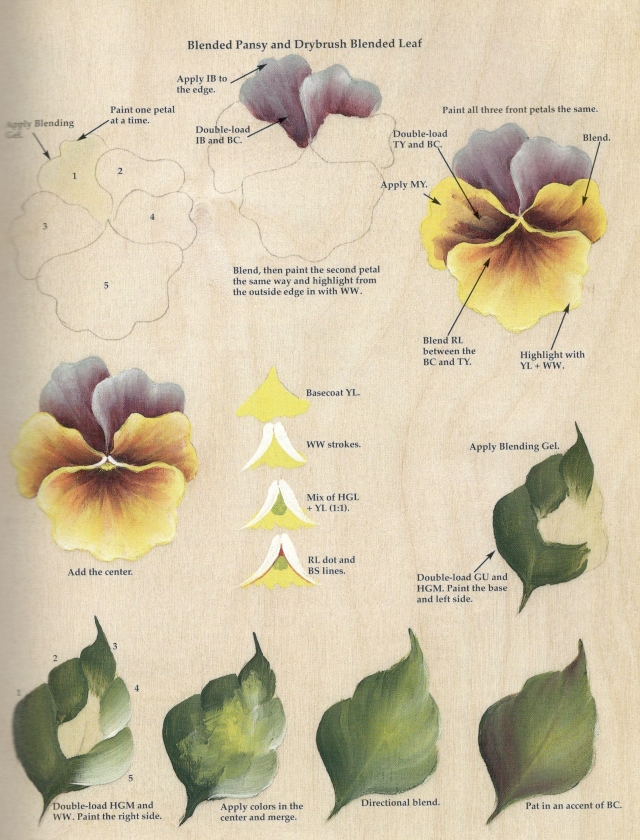
When I blend a multi-petal flower like a pansy or a poppy, I number the petals before I begin to paint. I paint the petal that is farthest to the back first, and then build forward to the top (front) petal. Carefully study the design before you begin so that you are aware of the shadows. Color always moves from the center of the petals outward. The placement of color and shadows should not be confused when blending.
When blending acrylics, the actual technique is easier when the paint is applied to unsealed wood. When a wooden surface is sealed, acrylic paint and extenders cannot penetrate the wood and will stay on the surface. This causes the paint to dry very quickly. If the wood is unsealed, then blending gel or extenders can penetrate the stained or raw, unsealed surface, enabling the acrylic paint to stay wet and be moveable for a longer period of time.
Gather your supplies
FolkArt Artists’ Pigments: Burnt Carmine (BC), Burnt Sienna (BS), Green Umber (GU), Hauser Green Light (HGL), Hauser Green Medium (HGM), Ice Blue (IB), Medium Yellow (MY), Red Light (RL), Turner’s Yellow (TY), Warm White (WW), Yellow Light (YL)
Brushes: Loew-Cornell Series 7300 Nos. 4, 8 and 10 shader, Series 7350 No. 1 liner Note: The size brush you use depends upon the size of the pansy you are painting. The above sizes were used to paint the step-by-step color worksheet.
Additional materials: Masterson Art Products Sta-Wet Palette, FolkArt Blending Gel Medium, tracing paper, transfer paper, stylus
Tips for blending
1. Always use as large a brush as possible.
2. The paint should be a thick, creamy consistency. Paint that is too thin does not blend or cover well.
3. Most of the time, I work on a Sta-Wet Palette because it keeps the paints wet.
4. Use a light touch when blending. A heavy hand or pressing too hard can create overblending or a muddy effect.
The pansy
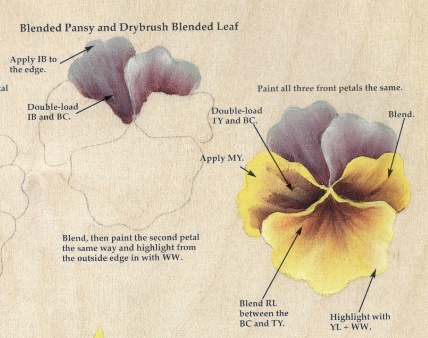 1.Neatly trace and transfer the pattern.
2. Beginning with the petal farthest to the
back, neatly apply Blending Gel Medium. Wait a few seconds for the gel to penetrate the unsealed wood.
3. Apply Burnt Carmine to the shadows (the portion of the petal that goes underneath the two side petals) and to the dark area in the center.
4. Wipe the brush, then double-load with Ice Blue and Burnt Carmine. Apply with the Ice Blue to the outside edges of the petal. As you will notice on the color worksheet, Ice Blue is applied only to the top of the petal and does not interfere with the shadows.
5. Wipe the brush (do not clean it). Begin to blend the Burnt Carmine out from the center and the Ice Blue in toward the center. Do not stipple or dab, but rather lightly move the paint back and forth, gently blending the colors together. Add more of either color as needed for contrast.
6. Apply Blending Gel Medium to the second petal.
7. Apply Burnt Carmine and Ice Blue in the same manner as for the first petal. Note the placement of the Ice Blue; it is applied to the light edge that overlaps the shadow of the first petal.
8. Wipe the brush, then blend.
9. Working one petal at a time, apply Blending Gel Medium to petals No. 3 and 4.
10. Apply Medium Yellow to the petal.
11. Double-load your brush with Turner’s Yellow and Burnt Carmine and apply shadows to the petal as shown. Wipe the brush, then gently blend the colors. Refer to the worksheet for placement.
12. Petal No. 5 (often referred to as the lead petal), is light on all three sides and dark at the center.
13. Apply Blending Gel Medium to the petal.
14. Apply Medium Yellow.
15. Double-load the brush with Turner’s Yellow and Burnt Carmine and apply the shadow to the center of the petal.
16. Double-load the brush with Yellow Light and Warm White and apply this highlight color to the outer edge of the petal. Wipe the brush, then gently blend the colors.
17. While the paint is still wet, I will often blend just a touch of Red Light between the Burnt Carmine shading to accent the petal.
The center
1. The center should be neatly and carefully painted. It is triangular in shape and opens onto the lead petal.
2. Basecoat the center Yellow Light.
3. Using a good liner and thinned Warm White, place two neat comma-like strokes on either side of the yellow.
4. Mix Yellow Light + Hauser Green Light and apply the small green area at the center. Study the worksheet for placement.
5. Apply a dot of Red Light deep in the triangle on top of the green mixture.
6. Use the liner and thinned Burnt Sienna to outline the center as shown on the worksheet.
The blended leaf
Note: As I have often said, “There are many ways of right and many ways to paint a leaf.” My basic brush stroke, drybrush blended leaf is featured in almost all of my books. When the skills of painting leaves are mastered, this is a quick, easy and beautiful leaf to paint. When I refer to skills I mean the proper filling of a brush, the understanding of proper paint consistency, knowing how to double-load a brush knowing basic brush strokes, and knowing how to blend. If these skills are under control, then the technique is not difficult to accomplish.
1. Apply Blending Gel Medium to the leaf.
2. Double-load the brush with Green Umber and Hauser Green Medium. Blend on your palette to soften the color and apply the dark shadow at the base. The first stroke pulls into the shadow, the second stroke above the first, and the third stroke— which is an incomplete “S” stroke—forms the center of the leaf.
3. Wipe the brush, then double-load with Hauser Green Medium and Warm White. Blend on your palette to soften the color.
4. Apply strokes No. 4 and 5 as shown on the worksheet.
5. Wipe the brush, then apply Medium Yellow, Hauser Green Light, and Warm White to the center of the leaf.
6. Wipe the brush and begin directional blending from the base of the leaf out and from the outside edges back to the base, using an extremely light touch.
7. If desired, while the leaf is still wet, an accent of Burnt Carmine can be applied to the shadow area of the leaf.
8. Use the liner to paint a thin, delicate vein with Medium Yellow.
Leave a Comment