
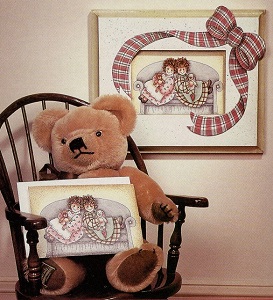
A friendship valentine. This card is a snap to paint, especially if you first make a decal of the design! Give it to a loved one or a special friend with the added surprise of a coordinating frame so the card can be displayed all year round.
Rating
Medium: acrylics on paper
Materials
- Brookhill unfinished frame, 5” x 7”
- Heavy watercolor paper or card stock, 11”x14”
- Canson-Talons Blank Watercolor Greeting Card and Envelope
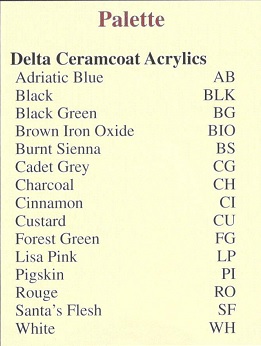
- Delta Ceramcoat Acrylics
- Brushes: Royal Brush Mfg. Series RG 700 3/4″ glaze/wash. Series RG 150 Nos. 8 and 10 shader, Series RG 595 No. 1 liner, and a large old soft-bristled brush (for applying glue)

- Tracing paper
- Transfer paper
- Stylus*
- Delta Soft Tints Matte Sealer & Glaze
- Light box
- Delta Wood Sealer
- Bubble palette
- Cotton swabs
- Sharp scissors
- X-Acto knife
- Sobo Premium Craft & Fabric Glue
- Technical pen with India ink, black*
- Old toothbrush for spattering
- Delta Water Base Varnish in satin
- Picture holders*
*Optional
Preparation
Note: Copy the designs for the card and ribbon with a photocopier following the steps below or, if desired, place pattern against a window (or use a light box) and trace onto tracing paper. Because the images have been reversed for use as a photo transfer, you will have to flip your tracing before transferring it onto the surface using transfer paper and a stylus. If you are only going to use the card as a greeting card and not insert it into the frame, trace inside Valentine message onto tracing paper and transfer onto surface using the same method.Step 1. Make a clean photocopy of the design, centering it on the paper.
Step 2. Apply two even coats of matte sealer to the design, extending it beyond the edges. Allow to dry completely.
Step 3. Apply two even coats of matte sealer to all surfaces of the card for protection.
Step 4. Tape the photocopy design to a window (or a light box) with the sealed (front) side toward you.
Step 5. Apply a thin layer of glue to the greeting card where you wish to apply the decal. Make sure entire surface is covered with a solid coating of glue.
Step 6. Place the glue-covered card over the photocopy, positioning it accurately.
Step 7. Immediately remove both pieces from the window and smooth down the photocopy, insuring that there are no air bubbles and adhesion is complete. Weigh down with a heavy book and allow to dry completely.
Step 8. Place a damp paper towel over the photocopy to soften it. Working in a circular motion and using your fingers, gently roll the paper off. You should have a clean, “reversed” copy of the line drawing. Take care when rolling the edges over, as the decal portion can rip! If needed, use a technical pen and waterproof India ink to fill in any areas of the design that may have been rubbed off. (Note: If you transferred the design onto card using the transfer paper and the stylus, ink all linework using the technical pen.)
Step 9. Seal with a coat of matte sealer before painting.
Step 10. Repeat above steps when transferring the ribbon design. You’ll need to use legal sized paper for the photocopy. Prep the heavy watercolor paper with matte sealer. After you’ve rubbed off all the paper, cut out ribbon shape with sharp scissors, using an X-Acto knife to get into the tight spots.
Painting
Note: All initial colors, except for SF, are applied as washes. To dilute the paint, place two drops of color and eight drops of water in your bubble palette. Stir thoroughly to disperse the pigment evenly. Dip an appropriate sized brush into the color/water mix, then thoroughly blot surface of brush on a paper towel until bristles are no longer shiny. Each area will need two color applications. To shade, use a floating technique, with undiluted paint. For linework, use slightly diluted paint, loaded onto the No. 1 liner, then wipe the tip of the brush on paper towels to remove excess water.
Card
Step 1. Using the 3/4″ glaze/wash brush, apply a wash of CU to background and then shade around the outer edges with PI.
Step 2. Apply a wash of AB to sofa and shade with the same color.
Step 3. Basecoat flesh areas with one application of SF. Shade with BS. Float a little RO in the shaded areas. Create “rosy” cheeks by dipping a cotton swab into RO and wipe it almost dry on a paper towel. Rub this onto the cheek. You should get a soft spot of color with no hard edges. Reline the eyes and mouth with BLK, and add WH highlight dots to the pupil and to the outer comers of the eyes.
Step 4. Apply a wash of LP to pink dress and shade with CL Dots are AB. Shade apron with CG.
Step 5. Apply a wash of BIO to bear and shade with the same color. Shade a second time to deepen color.
Step 6. Wash green dress with FG and shade with BG. The stripes are CI. Wash and shade apron with BG. The heart is CI.
Step 7. Shade bunny with CG. Wash the insides of the ears, nose, and feet pads with LP and shade with CI.
Step 8. Wash hair with BIO, then BS. Float BLK shading around each clump of hair. Rewash hair with PS, then apply BIO again for a variegated look.
Step 9. Apply a wash of CH to shoes and shade with BLK.
Ribbon
Step 1. Float sheer BLK in all the shadow areas.
Step 2. Using the color photo as a guide and working in a vertical direction, apply a wash of AB to every other stripe.
Step 3. Wash every other stripe horizontally with CI.
Frame
Step 1. Seal with wood sealer and sand until smooth.
Step 2. Basecoat with a solid application of WH, lightly sanding in between coats.Step 3. Spatter with thinned AB, CI, and FG.
Step 4. Apply a wash of FG on the bevelled edges and the inside edge.
Finishing
Step 1. Apply two coats of varnish to card, frame, and ribbon, allowing time to dry between each application.
Step 2. Glue the ribbon into place on the frame.
Step 3. To mount the card front (for the frame), glue it onto a piece of heavy illustration board cut to the exact size of the card front. Weigh down to dry.
Step 4. Install card in frame by either gluing it into place or inserting picture holders on all four sides.
Step 5. Ink inside message for the greeting card, or create your own personal message!
 Note: Copy the designs for the card and ribbon with a photocopier following the steps below or, if desired, place pattern against a window (or use a light box) and trace onto tracing paper. Because the images have been reversed for use as a photo transfer, you will have to flip your tracing before transferring it onto the surface using transfer paper and a stylus. If you are only going to use the card as a greeting card and not insert it into the frame, trace inside Valentine message onto tracing paper and transfer onto surface using the same method.
Leave a Comment