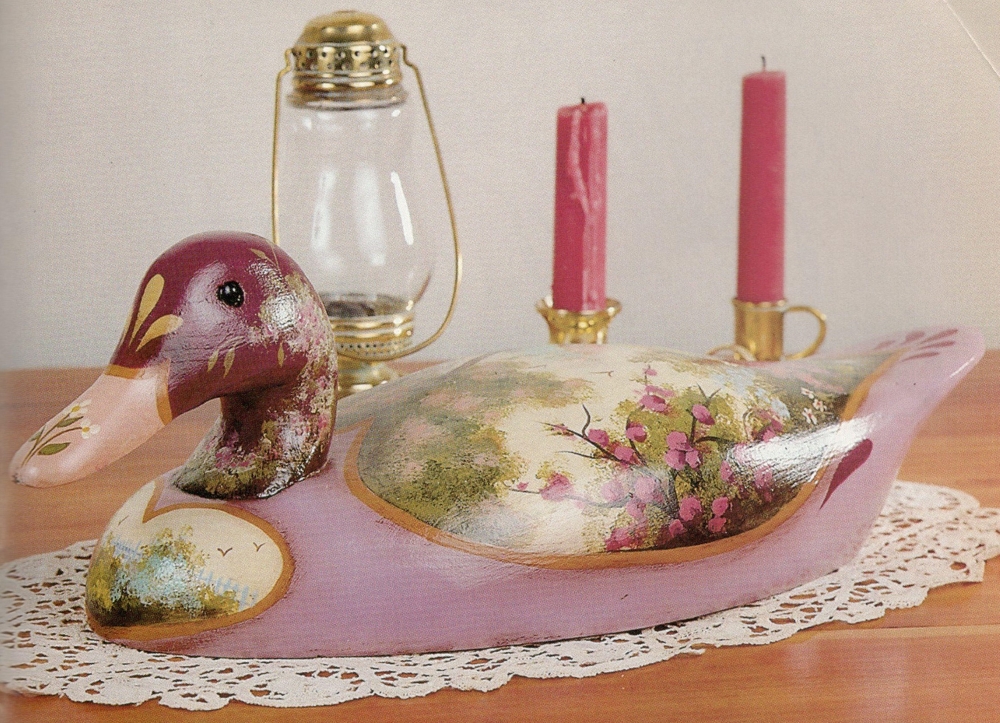
Our wooden duck decoy provides a unique surface on which to portray the delicate blossoms of spring.
Rating
Medium: acrylics on wood
Materials
- Dux’ Dekes Decoy Co. wooden decoy
- Delta Ceramcoat Acrylics
- Brushes: Loew-Cornell Series 7000 Nos. 2, 4, and 5 round; two 1″ sponge brushes of choice
- Sandpaper
- Tack cloth
- Tracing paper
- Black graphite paper
- Stylus
- Palette
- Scissors
- Sponge
- Burnt Umber oil pigment
- McCloskey’s Clear Glaze Coat
- Linseed oil
- Paper towels
- Cotton swabs
- Brown paper bag
- Varnish of choice
Preparation
Step 1. Using a 1” sponge brush, basecoat decoy PU + (WH). Allow to dry.
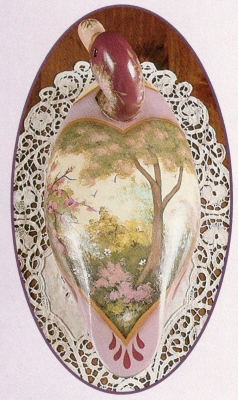
Step 2. Sand and then wipe with the tack cloth to remove dust. Trace pattern onto tracing paper, but transfer only heart designs and beak border onto surface using graphite paper and the stylus (refer to pattern for placement). Basecoat hearts AW. Paint head GR and beak NC + (WH).
Step 3. Transfer pattern details onto surface using graphite paper and the stylus.
Painting
Step 1. Cut small pieces from a sponge with scissors, making sure to round all edges. (You will be using these pieces when applying most of your colors.)
Step 2. Sponge the bottom third of the large heart with BF. Allow to dry. Now sponge the same area with LG and then OY, allowing all three colors to show.
Step 3. Tree is DB. Use a round brush to paint the lighter side DB + MB, adding a small amount of WH to this mix to further lighten some areas. Allow to dry. Sponge leaves with BF and OY. Flowers are sponged on with NC.
Step 4. Sponge on bushes in middle of heart with BF, and then sponge OY over the BF. Blue bush on the left side is BD with a TBB center. Blue bush on the right is PB + WH. Paint yellow bush BY. Large flowering bush on the left side is sponged with BF, and then with LG over the BF. Paint flowers GR and highlight edges with LD. Small white daisies are WH with RO centers. Purple bush on right is PU + WH.
Step 5. Comma strokes on the back of decoy are GR.
Step 6. Flowers on head are OY. Sponge sides with AW and allow to dry, then sponge LD over top. Comma strokes above beak are PI + AW. Daisies on beak are WH with BY centers. Leaves are BF + AW.
Step 7. Sponge lower portion of small heart with BF, then with OY. Paint fence PB + BD. Tree on left is OY, pink bush is PP, yellow bush is BY.- and blue bush on right is TBB.
Step 8. All birds are MB + WH.
Step 9. Trim hearts and beak with PI.
Finishing
Step 1. Allow all paint to dry thoroughly. Mix equal amounts of Burnt Umber oil pigment and clear glaze coat to make “mud.” Using a 1” sponge brush, cover entire project just as you would basecoat, but sparingly. Rub off as much “mud” as you wish with paper towels.
Step 2. Use linseed oil to lighten background, leaving all edges darker, and to lighten the lightest areas as much as possible. This project should be toned with “mud”; shadows are only necessary on edges.
Step 3. Remember that linseed oil is flammable. Unattended dirty paper towels can smolder and burn. Please soak in water immediately when finished and place outside.
Step 4. I like to let my projects dry for at least ten days to two weeks before varnishing. Clean with a tack cloth before applying the first coat to remove lint from mudding. Apply first coat of varnish (following manufacturer’s label directions). Allow to dry and lightly sand with a piece of brown paper bag. Wipe with the tack cloth and apply a second coat of varnish.
Palette
| Delta Ceramcoat Acrylics | Abbreviation |
|---|---|
| Antique White | AW |
| Blue Danube | BD |
| Boston Fern | BF |
| Bright Yellow | BY |
| Dark Brown | DB |
| Grape | GR |
| Leaf Green | LG |
| Lilac Dusk | LD |
| Mocha Brown | MB |
| Nectar Coral | NC |
| Olive Yellow | OY |
| Pretty Pink | PP |
| Pigskin | PI |
| Periwinkle Blue | PB |
| Purple | PU |
| Rouge | RO |
| Tropic Bay Blue | TBB |
| White | WH |
Leave a Comment