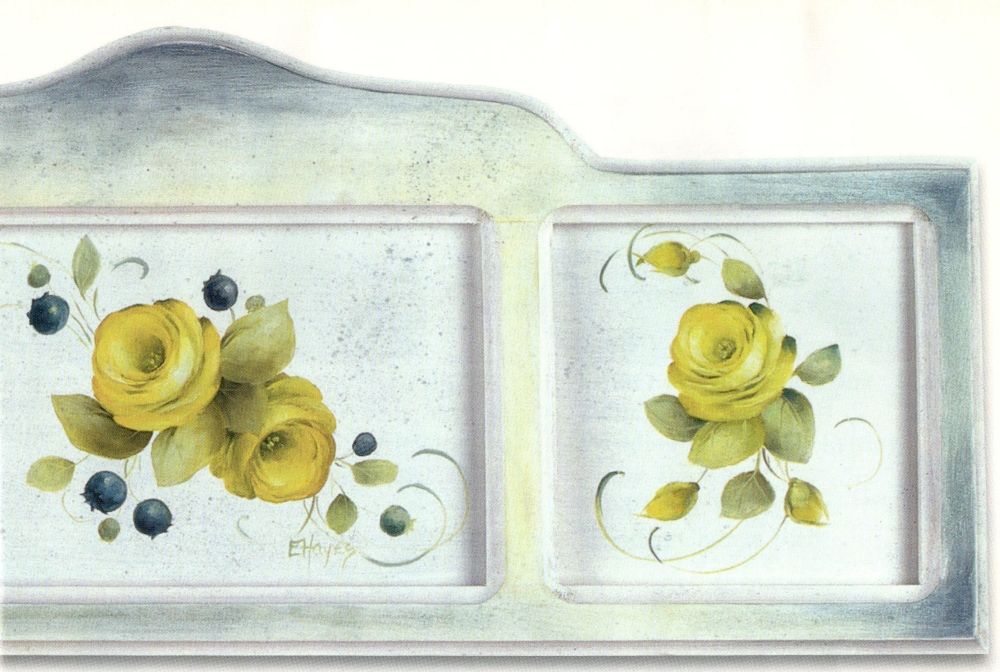
Painting a rose can be indeed a difficult task if you don`t understand its structure and how it is developed. But once you understand, you ‘ll be painting roses on everything!
Materials
Palette
- White acrylic paint of choice Winsor & Newton Artists’ Oil Colours Cadmium Lemon (CL)
- Ivory Black (BLK)
- Prussian Blue (PB)
- Raw Sienna (RS)
- Titanium White (TW)
- Yellow Ochre (YO)
Brushes
Winsor & Newton
- Series 710 Nos. 4 and 8 short bright Liner
- Foam brush
Other Supplies
- Carolyn’s Folk Art Studio wooden frame with masonite panels
- Fine sandpaper
- Tack cloth
- Jo Sonja’s All-Purpose Sealer
- Tracing paper
- Pencil
- Graphite paper
- Stylus
- Krylon Matte Spray, No. 1311
- Soft cloth
- 9″xl2″ oil palette
- Paper towels
- Odorless turpentine
- Old toothbrush
- Krylon Satin Spray
Preparation
 1. Sand the wooden frame lightly and wipe with the tack cloth to remove dust.
2. Using the foam brush, basecoat and seal the frame and panels in one step with white acrylic paint + sealer (1:1). Let dry, then sand again lightly and wipe. Brush on another coat of paint + sealer if needed and allow to dry thoroughly.
3. Trace the pattern onto tracing paper and transfer pattern outlines only onto panels using graphite paper and the stylus do not transfer any detail within the roses or any linework at this point.
Painting
Note: I normally like to spray dry my paintings with matte spray after everything is basecoated. This enables me to apply detail on a dried basecoat. Spray drying doesn’t actually dry the paint, but instead applies a protective coating over the wet paint so that you can detail over a dry surface. However, roses are the exception because there isn’t really a basecoat. I develop my rose as far as I can, spray dry, then come back and add deeper darks and lighter lights if necessary. If you spray dry, use thin layers of paint—thick layers will not work with this method. Several light coats are better than one heavy coat. Always spray outdoors within a day’s painting period. Don’t wait until the day after to spray or the paint will bubble.
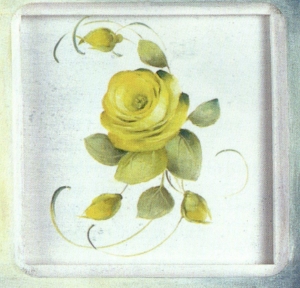
Roses
Note: To help you understand the structure of a rose, it is necessary to dissect it and study each part. A rose is basically composed of three parts—the top third makes up the back row of petals, the middle third makes up the bowl, and the bottom third consists of the outside petals that wrap around each other. Don’t think of this rose as just a “stroke rose” as I don’t try to develop a petal with just one stroke. I am constantly lifting, pressing, and blending with my brush as I create petals.
1. Using the No. 8 short bright, mix RS + BLK and begin placing this color at the bottom of the rose. Keep the paint fairly thin and dry, allowing some of the background to show through. Pick up a small amount of YO and continue toward the top.
2. Use the end of a brush handle to score the rose into thirds—this will help you visualize each section. Next, score a “V” into the rose, starting at the top third line and meeting in the middle of the rose. The angle of the “V” is important as this will guide your brush into the correct position.
3. Begin laying in the back row of petals with a mix of YO + CL. Place your brush on the angle line and continue up and around the top, ending at the opposite angle.
4. Add a bit of TW to the mix and continue adding rows of petals, keeping the brush at the correct angle. Concentrate on staggering the rows so that they don’t all line up one on top of the other. With each row that comes forward, add a little more CL and TW to the mix.
5. To form the front bowl of the rose, mix YO + CL. Begin by placing your brush on the chisel edge and start to pull down, then flatten the brush as you work your way around, ending back up on the chisel edge. Think skinny, wide, skinny.
6. Continue to form the bowl by adding more CL + TW to the mix for additional rows of petals.
7. To form the outside wrapping petals, mix YO + (CL) and begin by forming the petal as if it comes from behind the back row. As the petal opens up, pick up more CL + some TW to lighten the edge of the petal that would catch more light. Finish the petal by ending up on the chisel edge of the brush and wrapping it around the bowl. Some of the basecoat color should still be visible. This will be blended and refined later.
8. Move to the other side of the rose and continue to form the outside petals. Concentrate on wrapping these petals around one another—don’t have them all meet at the same place.
9. Refine the rose by blending the background color into the outside wrapping petals. Add deeper darks and lighter lights. The deepest darks are made by mixing RS + BLK + (PB) and the lightest lights are CL + TW. Blue tints are added to help the rose relate to the blueberries. Add stamens and pollen using the corner of your brush with YO and CL.
Blueberries
1. Basecoat the ripe berries BLK + TW + (PB). Shade with BLK + PB, then add more TW to the basecoat mix to high-light.
2. Add the reflected light with a very light green mix of CL + TW + (BLK). Keep the paint splotchy and don’t be tempted to overblend as this would destroy the vibrancy of the colors and the life of the painting. Note: Use greens from the leaves for the smaller, unripe berries.
Leaves
1. Create various green values by mixing BLK + CL + TW. It is helpful to create a series of greens from dark to light on your palette and then choose from these many values when painting. Basecoat the leaves using the green values to create depth and add interest. Refer to the color photo as you work.
2. Use darker green values to shade the leaves and lighter green values to highlight as needed. Add more CL and TW to the base mix to make the foreground leaves appear lighter and warmer. Keep the background leaves cooler by adding more BLK and less CL to your mix.
Linework
Thin a light green value on your palette with odorless turpentine and use the liner to apply the linework. Keep your hand fairly loose. Shade and accent the linework using colors from your palette.
Antiquing the frame
Using mixes from the blueberries, brush color around the comers and top of the frame. Soften the color with a soft cloth so that it gradually disappears. Add YO and CL to the areas that divide the panels in the same manner.
Spattering
Thin down some blues on your palette with odorless turpentine and pick up on the toothbrush. Scrape a brush handle across the toothbrush bristles to spatter the painting. This helps to soften the look of the background.
Finishing
Apply satin spray varnish to all surfaces following manufacturer’s instructions, allowing adequate drying time between applications. Once dry, attach the panels to the frame as desired.
Leave a Comment