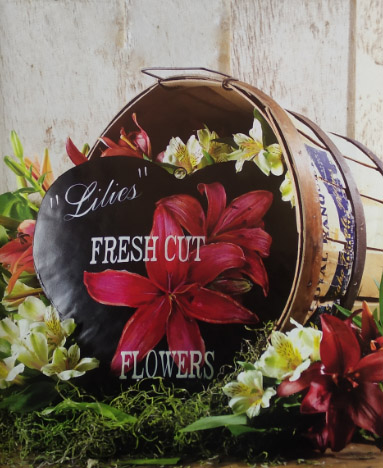
Every garden must have a lily! There are so many different types of lilies but they all seem to have one thing in common: large, showy fragrant blossoms that come back beautifully each year.
Materials

-
Della and Company Folk Art Tin Ornament Puffed Large Wall Heart, #FT-2231 (12″)
-
DecoArt Americana Acrylics: Antique Gold Deep, Black Green, Bubblegum Pink, Cadmium Orange Hue, Cherry Red, Deep Burgundy, Flesh Tone, Hauser Dark Green, Jack-O’-Lantern Orange, Lamp Black, Light Avocado, Napa Red, Payne’s Grey, Royal Fuchsia, Shading Flesh, Snow (Titanium) White, Tuscan Red, Vivid Violet
-
Princeton Art & Brush Co. Select 1 -1 /2″ bristle bright (Series 3750BB-150); #6 chisel blender (Series 3750CB-6); 1/4″ deerfoot (Series 3750DF); 1/2″ and 1″ flat wash (Series 3750FW-050 and 100); #1 liner (Series 3750L-1);
1 /4″ lunar blender (Series 3750LB-025); 1/4″ and 3/4″ oval mop (Series 3750LM-025 and 075); #10/0 short liner (Series 3750SL-10/0); #1 script liner (Series 3750SC-1); #6 round (Series 3750R-6) -
DecoArt Americana Multi-Purpose Sealer; Acrylic Sealer/Finisher, Matte (spray)
-
Miscellaneous: pencil, sandpaper, stylus, tracing paper, vinegar, white graphite paper
Preparation
Note: Follow all manufacturers’ label instructions for proper product usage.
-
Lightly sand tin but do not scratch the surface. Wipe tin with vinegar + water (1:1). Allow to dry.
-
Mix equal parts of Multi-Purpose Sealer + Black Green, and basecoat entire tin surface using the 1-1/2″ bristle bright. When dry, apply a second coat of this mixture. Then rebase with Black Green (no sealer added).
-
Use the 1″ flat wash with Lamp Black to shade around the outside edge of the heart. Mop to soften using the 3/4″ oval mop. If necessary, repeat several times in order to build the color so that it is visible.
-
Trace and transfer the pattern lines using white graphite paper.
-
Use the #6 round to undercoat the lilies and bud with one coat of Snow White. Base with Cherry Red, and then wash with Tuscan Red, keeping the wash stronger in the middle of each flower and fading toward the tips.
Painting
Note: Refer to the pattern for placement of shading (///), highlights (…), and tints (XX).
-
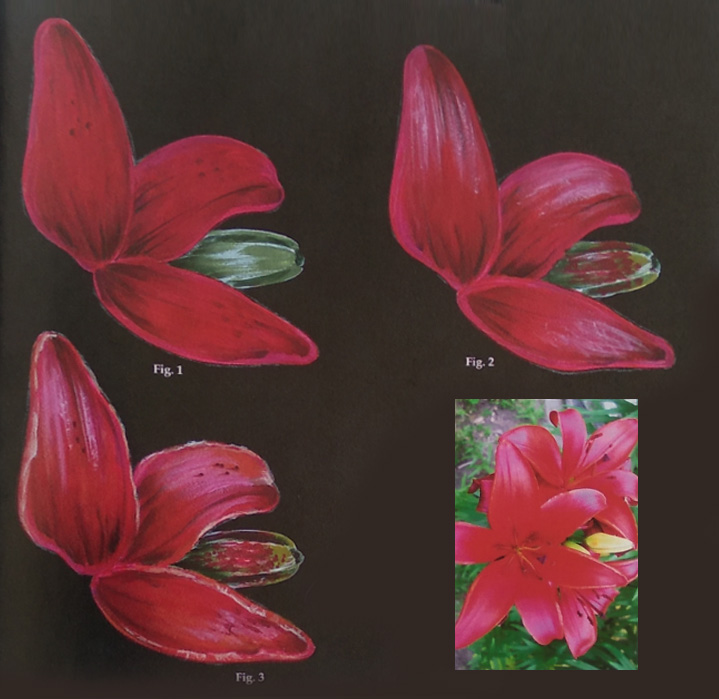
Petals. Use the 1/2″ flat wash to shade and chisel in color, following the shape of the petals. Start with Deep Burgundy, and then deepen with Napa Red. Mop to soften. Slightly deepen the middle with Payne’s Grey, and then apply a hint of Black Green. With each application, apply progressively less paint in a gradually narrower area. Line a few freckles with Napa Red (Fig-1).
-
Highlight petals. Use the 1/4″ lunar blender to drybrush highlights of Vivid Violet. Chisel Royal Fuchsia over the highlights and brighten with chisels of Bubblegum Pink. Lightly stipple with Bubblegum Pink to create texture (Fig. 2).
-
Petal edges. Create the outside edges of the petals with chisels of Shading Flesh, and then brighten with Flesh Tone. Skip a line of brush-mixed Flesh Tone + Snow White to randomly brighten. Tint petals with drybrushes of Cadmium Orange Hue (Fig. 3).

-
Bud. Float and chisel Light Avocado from the top down and bottom up. Deepen shading near the ends and against the middle section with Hauser Dark Green, and then further deepen with Black Green. Touch in a small amount of Black Green on the tip (Fig. 1).
-
Bud edges. Highlight the outer edges of each section with Antique Gold Deep, allowing some Snow White to show through. Chisel Tuscan Red through the middle. Add some Tuscan Red freckles using the #1 liner (Fig.2).
-
Shade bud. Deepen the shading by chiseling and stippling with Deep Burgundy. Use the dirty brush to pick up a small amount of Lamp Black and deepen slightly more (Fig. 3).
-
Details. Use the #1 script liner with Cadmium Orange Hue to line the stamen. While the paint is still wet, skip Jack-O’-Lantern Orange through the middle to brighten the stamen on the front flower and skip a line of Royal Fuchsia through the middle to brighten the stamen on the back flower. Stipple pollen on the ends of the stamen with Payne’s Grey, and while still wet, stipple with Snow White to brighten. Loosely shade Payne’s Grey along the stamen. Use the #10/0 short liner to line the very middle of the front flower with Antique Gold Deep, and while still wet, stroke Black Green at the base and Snow White at the tip. Blend.
-
Lettering. Use the #1 liner to apply Snow White lettering. To achieve straight lines, start with the vertical lines, and then turn the piece and apply the horizontal sections. If needed, switch to the #10/0 short liner for the horizontal strokes of the lettering.
Finishing
When throughly dry, spray finished piece with Sealer/ Finisher.
If you like painting flowers, you should definitely try our Orchid on Parchment Home Project
Leave a Comment