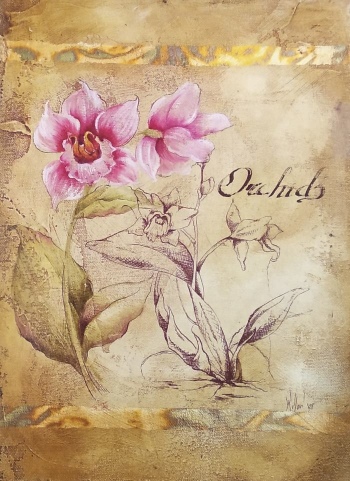
Painting home decor involves the combination of unique background elements, such as collage and texture. Often background effects set the stage for a simple painting style, creating depth and dimension for the viewer, as shown in the project featured here.
Materials

-
Gotrlck Canvas (9″ x 12″)
-
Solid wood frame
-
Martin/F. Weber Prima Acrylic: Warm White
-
Martin/F. Weber Professional Permalba Oil Colors: Permalba White
-
Martin/F. Weber Prima Oil Colors: Alizarin Crimson, Burnt Sienna, Cadmium Red Medium, Cadmium Yellow Light, Ivory Black, Titanium White, Ultramarine Blue
-
Princeton Art and Brush Co. Select #4, #6, and #8 chisel blender (Series 3750CB); #10/0 liner (Series 37501); 1/4″ and 3/8″ lunar blender (Series 3750LB); 1/4″ and 1/2″ lunar mop (Series 3750LM); #1 round (Series 3750R); 1-1/2″ bristle bright (Series 3750BB)
-
Artograph DesignMaster Projector or waxless graphite for tracing designs
-
Krylon Matte Finish, #1311; Artist’s Varnish, Satin, #7002
-
Martin/F, Weber Odorless Turpenoid; Turpenoid Natural; Res-n-Gel
-
X-ACTO Knife
-
Speedball Art Products:
Pigmented Acrylic Drawing and Calligraphy Inks: Burnt Umber, Primrose Yellow, Scarlet Red, Super Black; Pen Nib Holder, Carnet #94165; Pen Nib, #C2 Flat; Flexible Pen Point, #512; Pen Cleaner; Variegated Black Leaf; Modeling Paste -
Willow Wolfe Be Creative Tape, 5 mm
-
Miscellaneous: flne-grit sandpaper, eye dropper, 1/2” wide masking tape, paper towel pencil, ruler, small metal palette knife, soft cloth or cheesedoth, , small glass jars, talc (baby) powder, tracing paper
Techniques
Note: The definitions below apply to this project and to my painting techniques, and may differ from other artists’ methods. For more painting definitions check the full Glossary
-
Dry-wipe (wipe). A technique used to clean the brush without using solvents. Place the brush between the folds of a paper towel, press down, and gently pull the brush out.
-
Brush mix. Mix two or more colors together using the brush instead of a palette knife, A between colors indicates a brush-mixed color. Each time you load the brush, the color may be slightly different; this adds variety to the painting.
-
Rouging. Mix the suggested color with Res-n-Gel (1:1) and load a small amount on a chisel blender. Gently wipe off some of the color onto a paper towel. Apply color to the shadow area of the design element. Wipe the brush; then drag or pull the color from the shadow area, following the growth direction. Allow the brush to run out of color as you rouge.
-
Pat-blending. Apply a sparse amount of color to the surface. An excess amount will become sloppy and move around too much, causing the colors to become muddy. Blend only where two values or colors meet. Gently pull the brush back and forth between the two values using choppy strokes. Dry-wipe the brush frequently to avoid too much of one value being pulled into the other. Once initial blending is complete, wisp over the blended colors to soften. Gently touch the surface with a mop brush to further soften the blended area.
-
Using the DesignMaster Projector. In my home studio, I use my projector for painting all designs, especially when inking is important. Make sure you do not have graphite lines on your surface, as they can repel the ink. You can purchase waxless graphite, but I find that difficult to remove and it smudges. I highly recommend investing in a projector. It’s a tool that has many applications, reduces preparation time, and simply makes an artist’s life easier!
Preparation
Note: Follow all manufacturers’ label instructions for proper product usage.
-
Applying texture. Lightly sand canvas and wipe clean. Use the metal palette knife to apply a very thin layer of Modeling Paste over the canvas, allowing the palette knife to skip over areas of the canvas. Let dry.
-
Basecoat. Basecoat the surface with acrylic Warm White. Let dry.
-
Staining with acrylic ink. Mix a medium value brown of Burnt Umber + Super Black + Scarlet Red + Primrose Yellow (10:5:1:1) in a small glass jar. This base mix will be referred to as Willow Brown and will be used undiluted for inking. Brush a touch of the color onto tracing paper to be sure you like the value, and adjust accordingly. Use an eyedropper to place a small amount of Willow Brown into a separate container. Add approx-imately 3 water to 1 part ink. The diluted mix is your stain. Use a damp cloth to apply the stain over the surface. Let dry. Have a clean, damp cloth available to wipe away excess ink. If your stain appears too dark or heavy, load a clean cloth with Pen Cleaner and rub over the center of the canvas, working in a circular motion while moving out toward the edges.
-
Metal leaf borders. Prior to metal leafing, apply a small amount of talc powder to your hands so that the leaf and tape do not stick to them. Apply a strip of masking tape 1-1/4″ from the top and 1-1/4″ from the bottom of the canvas. Press down and rub along the edges. This is a simple way to ensure a consistent line. Apply Creative Tape alongside the masking tape. Use the X-acto Knife to cut away excess tape. Remove the masking tape beside it. Remove the backing from the Creative Tape. Crumple a sheet of Variegated Black Leaf in your hand and rub it over the tape. Burnish using the 1/2″ Lunar Mop.
-
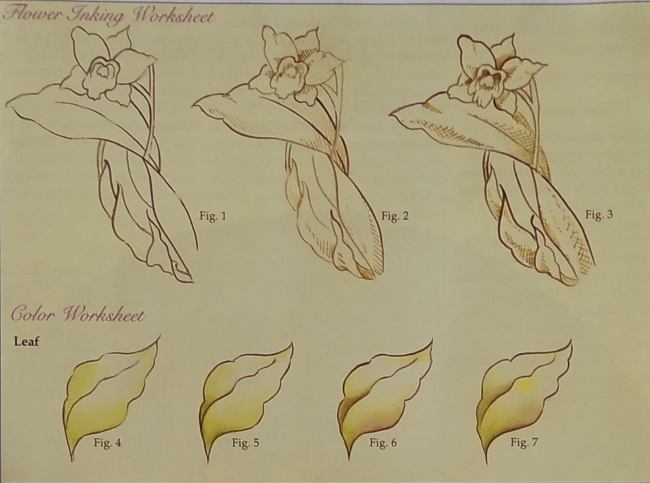
Inking the design and lettering. Transfer the entire design to be inked or place the line drawing in the DesignMaster Projector. Insert the #512 Nib into the Pen Nib Holder, dip the pen in undiluted Willow Brown, and test on a small piece of tracing paper to start the ink flow. Begin to draw the outline of the inked floral design (Fig. 1). Each time you load the nib, draw a line on tracing paper to get the ink flowing and to avoid blobs. Allow the outline to dry. Line shading (Fig. 2). Proceed with dots and crosshatching to deepen shading (Fig. 3). On the painted portion of the design, only ink the outline of the leaves (Fig. 4), the left side of the stem, and a few tips of the painted orchid — less is more at this point (Fig. 8). If you decide you want a more clearly defined edge to the painted flower, more inking can be done after the painting is dry.

Clean the nib in Pen Cleaner. Use the #C2 Nib to ink the lettering.
Mixtures
Premix the following oil colors: Pink:
Permalba White + Alizarin Crimson (10:1)
Dark Pink: Pink + Alizarin Crimson (1:1)
Medium Green: Cadmium Yellow Light + Ivory Black (5:1)
Dark Green: Medium Green + Ivory Black (1:1)
Painting
Note: Refer to the Color Worksheet.
Leaves and stem
-
First shading. Load a lunar blender with Res-n-Gel, pick up a touch of Medium Green, dry-wipe the brush, and rouge or coax color out from the shade areas of the leaves (Fig. 4).
-
If desired, spray canvas with a light coat of Matte Finish to set the color into the background. This allows the next value to sit on top very nicely; however, I prefer to avoid spray products, so I allow the surface to tack up naturally before proceeding to the next layer or value of color.
-
Second shading. Load a lunar blender with Res-n-Gel, pick up Dark Green mix, apply to an area smaller than the first shadow, and gently rouge outward (Fig. 5).
-
Accents. Wipe the brush, load with a touch of Alizarin Crimson, and apply a few accents to the outer edges of the leaves (Fig. 6).
-
Leaf details. Wipe the brush, load with a touch of Alizarin Crimson, and apply a few accents to the outer edges of the leaves (Fig. 6).
-
Stem. Load a lunar blender with Res-n-Gel, pick up Medium Green mix, and apply to the left side of the stem using the chisel edge of the brush. Wipe the brush and rouge the color to the opposite side of the stem. Darken, if desired.
-
Highlight. Heavily load the liner with Cadmium Yellow Light and dot the highlight area of the leaf. Pick up a touch of Titanium White and add a few brighter dots to the center of the highlight area (Fig. 7).

Orchid petals
-
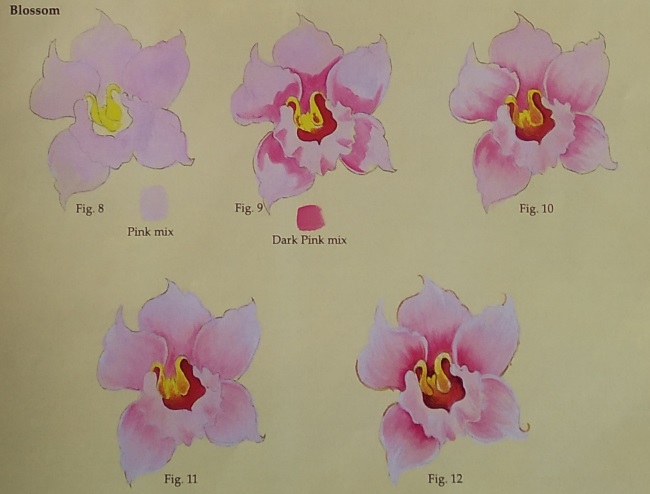
Base. Base the petals with Pink mix + Res-n-Gel using the #6 chisel blender (Fig. 8).
-
Shade. Apply Dark Pink mix shading near the flower centers (Fig. 9); wipe the brush, and pat-blend (Fig. 10).
-
Highlight. Press and pull Permalba White highlights on the edges of the petals; dry-wipe the brush and pat-blend (Fig. 11).
-
Further shade. Apply Alizarin Crimson to the darkest triangular areas; pat-blend (Fig. 12). In a few of the darkest corners, apply a few dots of thinned Burnt Sienna using the liner brush.
-
Further highlight and detail. Use the #1 round to stroke Titanium White highlights from the outer edges of the petals toward the middle, following the shape of the petal. Add final details and linework with thinned .Titanium White using the liner (Fig. 12).
Flower center
-
Base. Use the liner to base the tips and center with Cadmium Yellow Light (Fig. 8). Base the inner center with Alizarin Crimson + Cadmium Red Medium. Use the liner to tap (or I stipple) where the yellow and red’ areas meet (Fig. 9).
-
Highlight. Use the liner to highlight the tips with thinned Permalba White (Fig. 10).
-
Shading. Stipple a few dots of thinned Alizarin Crimson + a touch of Ultramarine Blue to shade the very darkest comers of the center (Fig. 11).
-
Detail. Use the liner to outline the yellow center with Cadmium Yellow Light + Permalba White (Fig. 12).
Finishing
-
Spray with Satin Finish, if desired.
-
Apply a few drops of silicone adhesive on each comer of the back of the canvas and insert the painting into the frame.

Leave a Comment