
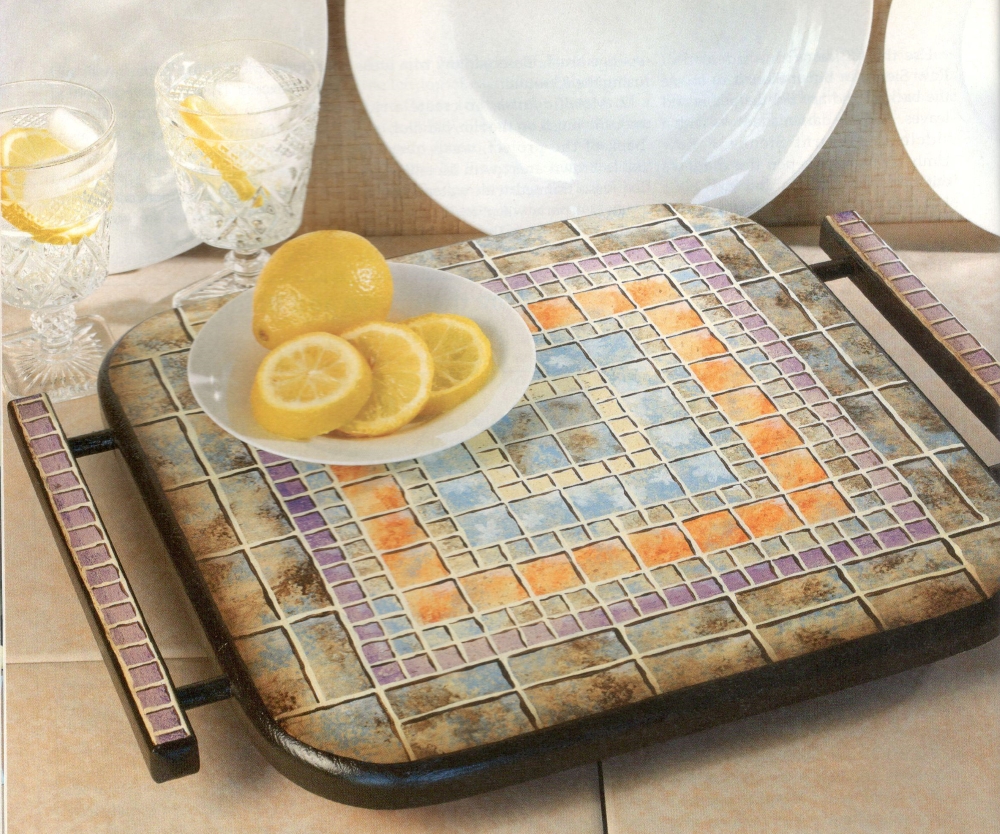
A faux mosaic is a perfect solution for a battered flea market find. Imperfections add realism to the project, and changing the size of the tiles adapts the pattern to any size surface. First create the faux sections, and then transform the sections into tiles for the mosaic. If you do not have a tray, a square table or chair seat would provide you with an interesting surface.
Mosaic Turntable
Preparation
Note: Follow all manufacturers’ instructions for proper product usage.
1. Prepare a used surface with sandpaper or fine steel wool to remove any dirt and to create tooth on a well-worn surface. Wipe to remove dust. Dents, scratches, cracks, holes, and other imperfections contribute to faux patterns, so do not fill them or repair them.
2. Use the #1 glaze wash to basecoat the surface first with a coat of Buttermilk + Sealer (1:1), then with additional coats of straight Buttermilk until opaque.
3. Using an old toothbrush, spatter the Buttermilk surface with Bittersweet + water (1:1). Let dry.
Materials
• Square surface of choice
• DecoArt Americana Acrylics: Baby Blue, Buttermilk, Bittersweet Chocolate, Canyon Orange, Grape Juice, Light Buttermilk, Titanium White
• Royal & Langnickel Majestic #12 shader (Series 4150), 1″ glaze wash (Series 4700); Aqualon 3/8”and 3/4″ angular (Series 2160), #10 filbert (Series 2170); Mini-Majestic #20/0 and #1 liner (Series 4200L); Soft-Grip fitch deerfoot stippler (Series SG393)
• DecoArt Multi-Purpose Sealer; DuraClear Satin Varnish; Instant Images Pocket Template, #IIP01 Floral; Glazing Medium
• Royal & Langnickel Soft-Grip Stylus
• С-Thru Ruler 2″ ruler
• Krylon Matte Finish, #1 311
• Miscellaneous: cotton swabs, eraser, gray graphite paper, natural sea sponge, palette knife, painter’s tape, paper towels, sea salt, toothbrush, tracing paper, water basin, white atercolor pencil
4. Trace pattern and center the tracing on your square surface. Transfer the design sections (not individual tiles) with gray graphite and the stylus, using the ruler to keep the lines niform and even.
Painting
 Note: All applications of paint for faux techniques are mixed 1:1 with water. If you prefer more open time to work the paint, you can substitute DecoArt Glazing Medium for the water, and allow a longer drying time before proceeding to the next step. Using tape is necessary to contain the separate faux sections. When applying tape, use even and firm, but not too hard, pressure. If the tape is pressed too firmly on the surface, it may pull off paint when removed. A too gentle application of tape may result in seepage under taped edges. As soon as possible after creating the faux look, remove the tape. Use a slightly dampened cotton swab to gently remove the color. What can’t be removed, will just contribute to the realistic look of the mosaic.
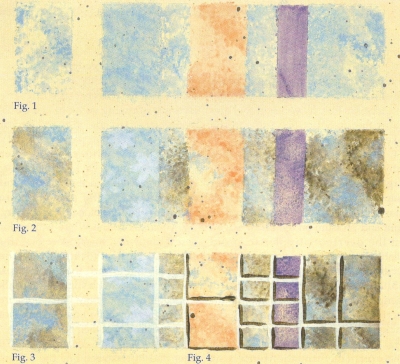
1. Center. Moisten the area with water. Lightly sponge Baby Blue + water (1:1) onto the area, allowing some background color to show through (Fig. 1). While still wet, sparingly sponge Bittersweet Chocolate + water (1:1) onto the same area (Fig. 2). Let dry.
 2. Orange. Sponge with Canyon Orange + water (1:1). Vary the pressure on the sponge to create random darker areas, and let dry (Fig. 1). Use a very small amount of Baby Blue + water (1:1) to sponge a limited amount of accent color into the area (Fig. 2). Let dry.
3. Purple. Note: Salt must be applied to an area while the paint is wet; therefore, work on small lengths at one time, rather than trying to complete an entire area. Using the #12 shader, wash a small length of the section with Grape Juice + water (1:1), then immediately sprinkle sea salt onto the area. Clean the shader brush between applications in order to avoid salt in the brush. When the entire purple section is completely dry, gently brush the salt away. Your fingertips are the best tool for this, as you will feel any grains that may not be visible to the naked eye (Fig. 2).
4. Blue flower. Sponge the entire area Baby Blue + water (1:1), and let dry (Fig. 1). Using the floral pocket template, randomly stipple flowers with Titanium White. Vary the amount of paint and pressure on the brush as you tap the deerfoot stippler to avoid creating uniform white flowers (Fig. 2). Let dry.
5. Blue brown — two sections. Softly sponge Baby Blue + water (1:1) into the sections, allowing some of the background color to show through (Fig. 1). Let dry. Repeat with Bittersweet + water (1:1) in the remaining Buttermilk areas. Sponge softly, in order to avoid overwhelming the Baby Blue color (Fig. 2). Let dry.
6. Large outer edge tile section. Sponge Baby Blue + water (1:1) into the sections, allowing some of the background color to show through. Repeat to deepen in random patterns (Fig. 1). Let dry. Sponge Bittersweet + water (1:1) in remaining background areas. When dry, repeat once to deepen and create a section that appears more brown in color than blue (Fig. 2). Let dry.
7. Grout. With the White watercolor pencil and ruler, mark placement for all grout lines. Working from the center section toward the outer edges, use the #1 liner with Light Buttermilk to create the grout lines. Vary pressure on the liner to create lines that are not perfectly straight at their edges (Fig. 3).
8. Tile dimension. With the #20/0 liner and Bittersweet, line the bottom and left side of each tile (Fig. 4). Using the 3/4″ angular and Bittersweet, shade against the top and right edges of the surface. With the 3/8″ angular and Titanium White, highlight the bottom left corners of the orange and brown/blue edge tiles.
9. Details. Use the #10 filbert with Bittersweet to basecoat all edges.
Finishing
1. Remove any transfer lines using the eraser.
2. Spray with Matte Finish to create a barrier between the paint and varnish. Let dry.
3. Apply at least three coats of varnish, allowing adequate drying time between applications.
Leave a Comment