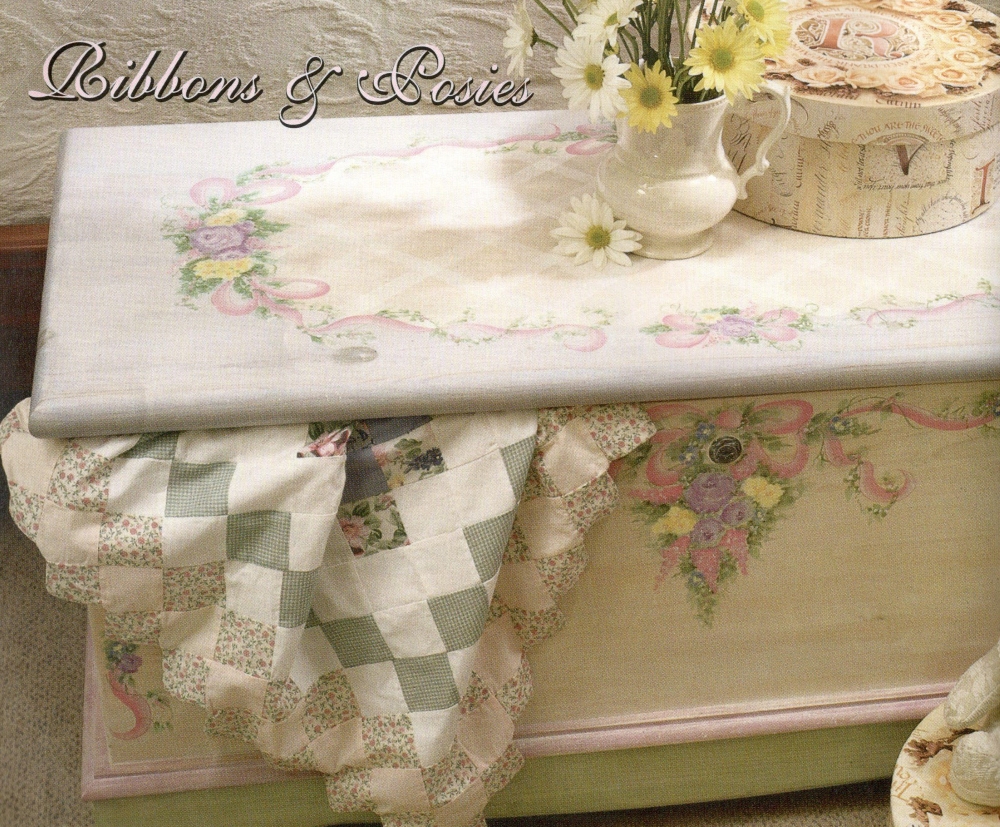
This whitewashed truck, with its soft floral design, will beautifully enhance your bedroom decor as well as provide for extra storage space.
Materials
Palette
- Aleene’s Premium-Coat Acrylics Deep Sage (DS)
- Dusty Sage (DSA)
- Light Blue (LB)
- Light Fuchsia (LF)
- Light Turquoise (LT)
- Light Violet (LV)
- Light Yellow (LY)
- Medium Blue (MB)
- Medium Fuchsia (MEF)
- Medium Green (MG)
- True Apricot (TA)
- True Violet (TV)
- True Yellow (TY)
- White (WH)
Brushes
Loew-Cornell
- Series 7000 Nos. 6 and 10 round
- Series 7300 Nos. 14 and 16 shader
- Series JS No. 1 Jackie Shaw liner Three 2″ foam brushes Spatter brush
Other Supplies
- Trunk of choice
- Sanding block
- Tack cloth
- Craft sticks
- Aleene’s Wood Stain Kit, No. 302 Oak/ Clear
- Disposable cups
- Gray chalk pencil
- Tracing paper
- Pencil
- Graphite paper
- Stylus
- Ruler
- Scissors
- Palette
- Paper towels
- Aleene’s Enhancers Satin Varnish
Preparation
Note: Read through all instructions thoroughly before beginning this project. Refer to the color photo as you work for exact color and design placement.
1. If needed, sand the trunk and wipe with the tack cloth to remove dust.
2. Pour the entire bottle of clear stain and half the bottle of WH into a cup. Mix thoroughly with a craft stick. Apply a small amount of this mix in a hidden area of the trunk to test the color and wipe off. If needed, add more WH to the mix to achieve the desired whitewash effect. Working one section at a time, use a foam brush to apply the mixture to the surface and wipe off with a paper towel. Continue working in sections until the entire trunk is covered. Allow to dry overnight.
3. Cut an oval from the tracing paper suitable to the size of your surface and transfer onto the trunk lid using graphite paper and the stylus. Using the ruler and chalk pencil, draw a single diagonal line within the oval shape— this will serve as a guide for the painted lines.
4. Mix WH + water (1:1). Use the No. 16 shader to paint a diagonal line next to the chalk line in the oval. Continue to add the other lines in this same manner. Allow to dry. Use a wet paper towel to remove the chalk guide line.
5. Draw a diagonal guide line going in the opposite direction using the ruler and chalk pencil. Use the thinned WH to paint the diagonal lines. Allow to dry. Use a wet paper towel to remove the chalk guide line. Paint over where the lines intersect with a stroke of thinned WH.
6. Thoroughly mix LB + water (2:1) in a cup. Use a foam brush to paint the remainder of the lid. Apply your strokes so that they follow the grain of the wood for a more uniform look. Allow to dry, then repeat if the result is too transparent.
7. Trace the patterns onto tracing paper and lightly transfer onto the surface using graphite paper and the stylus.
Painting
 1. Ribbons and bows. Thin LF + WH with a small amount of water, then basecoat the ribbons and bows with the No. 14 shader. Shade with MEF + LF (1:1) and float highlights with WH. Use the liner to outline the ribbons and bows with the shading mix.
2. Background. Mix LT + DS (1:1) and thin with water to a milky consistency. Use the No. 16 shader to slip slap this mix in the background areas of the greenery.
3. Purple roses. For the flowers, thin all paints with water (1:1). Use a round to basecoat the purple roses WH. Add strokes of LV. Mix three different shades of WH + LV and use a round to paint the petals, layering the three colors. Float a small amount of TV to separate the flowers and petals.
4. Yellow flowers. Use a round to base in the yellow flowers with TY + WH. Paint the petals and deepen the color of the flowers with TY. Fill in the center of each flower with dots of TA + TY. Separate the flowers with a float of TA.
5. Pink flowers. Using a round, fill in the flower area with LF + WH (1:1). Dip the dirty brush into LF and pounce to create a cascade appearance. Next, brush mix in some MEF and dab onto the flowers to darken. Float MEF at the base of the flowers, then add random dots of WH.
6. Blue flowers. Use the No. 14 shader to basecoat the blue flowers with a brush mix of WH + MB. Add more MB to the mixture and use a round to apply the petals. Dip the dirty brush into MB and place smaller flowers randomly around the design. Dab the centers with LY.
7. Leaves and vines. Squeeze dots of DS, DSA, MG, and WH onto your palette. Brush mix these colors together, thin with water, then use the No. 14 shader to base in the larger leaves. Add the smaller leaves using a round. Use the same color and the liner to paint the vines and tendrils. Slip slap greens from your palette into any of the empty areas. Also use these greens to apply the filler leaves. Float DS around the flowers and in the leaf areas to darken and separate.
8. Place dot flowers randomly along the vines and around the bows with the pink mixtures. Use a round to add WH dots among all flower sections. Allow to dry.
Finishing
1. Thin WH, MG, and TY with water. Spatter each color separately over the entire trunk and allow to dry.
2. Use a foam brush to carefully apply a coat of satin varnish to the piece, avoiding air bubbles in the finish. Allow to dry.

Leave a Comment