
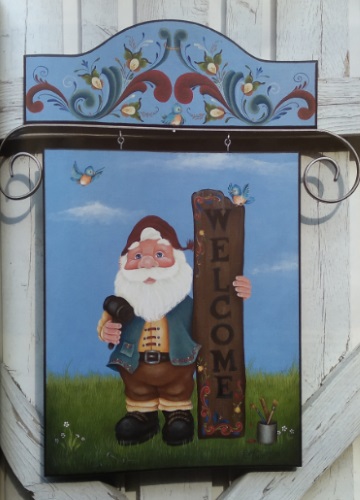
Whether you spell it welcome or velkommen, the sentiment is “come on over and let’s enjoy the day together”. So grab some paint and your friends, and spend the day making something special.
Materials
-
Viking Woodcrafts Wooden Sign, #20-11035 18-1 /4″ x 22-1 /2″)
-
DecoArt Americana Acrylics: Avocado, Baby Blue, Base Flesh, Black Green, Blue Haze, Blue Mist, Buttermilk, Cadmium Red, Dark Chocolate, Hauser Light Green, Hi-Lite Flesh, Honey Brown, Lamp Black, Light Buttermilk, Light Cinnamon, Midnite Blue, Neutral Grey, Rookwood Red, Sapphire, Shading Flesh, Snow White, Yellow Ochre
-
Royal & Langnickel Royal Majestic 1/4″, 3/8″, 1/2″, and 3/4″ angular (Series R4160); #2, #4, and #6 filbert (Series R4170); #0 round (Series R4250); #10/0 script liner (Series R4585); 1/4″ and 3/8″ deerfoot stippler (Series R4650); Golden Taklon 1/4″ filbert comb (Series R930); Kingslan #4 Magnificent Mop (Series R4999-4)
-
Raphael Kolinsky #2 quill (Series 16684)
-
DecoArt Americana Multi-Purpose Sealer; DuraClear Satin Varnish
-
Saral White Graphite Paper
-
Loew-Cornell Blue Chaco Paper
-
Miscellaneous: fine-grit sandpaper, palette paper, paper towels, pencil, small sea sponge, soft cloth, soft eraser, stylus, tracing paper, water basin
Preparation
Note: Follow all manufacturers’ label instructions for proper product usage.
-
Seal the wood with Multi-Purpose Sealer. Dry. Sand, and wipe clean with the soft cloth. There is no preparation for the decorative metal parts of the sign.
-
Transfer the horizon line. Transfer each element and details as needed.
-
Basecoat the sky area and the top wood piece with Sapphire + Baby Blue (1:2). Basecoat the grass area with Avocado.
*You can find all of the colors used in this project in this list of colors.
Painting
“Welcome” sign
-
Sky. Moisten the sky with clean water. Use the sea sponge to tap in Buttermilk and then Snow White clouds, keeping the clouds light and fluffy. Use an angular brush to float some softer wispy clouds.
-
Grass. Use the filbert comb with Avocado to stoke grass blades against the skyline. Then rake in the grass with Hauser Light Green. Apply some Yellow Ochre into the Hauser Light Green areas. Use the dirty brush to apply Buttermilk. Keep the lighter colors toward the back. Apply the foreground grass with Avocado 1 a touch of Blue Haze. Add some Light Cinnamon to some grass for color variety.
Add daisies at the foot of Arne with dip-dots of Snow White with stems and leaves of Hauser Light Green + a touch of Yellow Ochre.
-
Wooden sign and hammer handle. Base with Dark Chocolate. Following the grain of the wood, use a deerfoot stippler to drybrush texture with Light Cinnamon. Use the dirty brush to drybrush with Neutral Grey, Yellow Ochre, Buttermilk, and lastly Dark Chocolate. Keep texture lightly layered. Shade with a mix of Dark Chocolate + Lamp Black. Apply a rugged highlight of sheer Neutral Grey to the top of the sign. Base letters with Lamp Black and softly highlight with Sapphire.
Stroke decorative scrolls on the sign with Cadmium Red, shade with Rookwood Red, and highlight with a line of Yellow Ochre. Load the brush with Midnite Blue and tip in Sapphire to apply the comma strokes. Apply green stems and strokes with Avocado tipped in Yellow Ochre. Stroke the sides of the rosemaled flowers with Honey Brown and the center stroke with Yellow Ochre. Dot at the bottom of each flower with Rookwood Red. Add other decorative dots with Yellow Ochre.
-
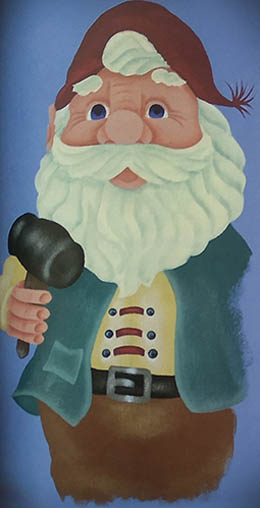
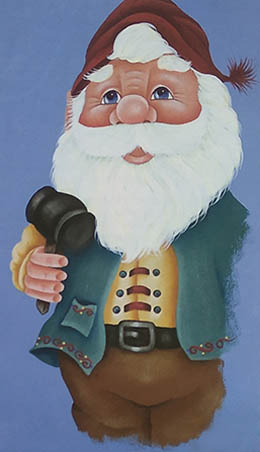
Arne’s face, hands, and ear. Base with Base Flesh. Use Shading Flesh to place the first shadows between fingers, at base of fingernail beds, on forehead against hat, around nose and the bridge of nose, around eyelids, in wrinkles and nostrils, and on cheeks and lips. Deepen shadows with Light Cinnamon. Drybrush first highlights of Hi-Lite Flesh just below brow bone, above cheeks, and in center of nose and lip. Float highlights on tips of fingernails, edges of fingers, above wrinkles on nose 1 sidecars/’ and on the outside edge of the ball of the nose. Brighten highlights with Light Buttermilk, except on the nose “sidecars” and eye wrinkles. Glaze cheeks, lips, and bottom of nose with sheer Cadmium Red. Line mouth with Rookwood Red. Add a Snow White high shine to lip, tips of fingernails, nose, cheeks, and eyelids.
Base eyes with Light Buttermilk. Add irises with Sapphire and pupils with Lamp Black. Shade irises with Midnite Blue and highlight with Baby Blue. Add high shine to eyes with Snow White. Once the features are crafted, add a little more definition by softly lining eyes, lip, and fingers, and shading the nostrils with Dark Chocolate.
-
Hat. Base with Rookwood Red. Drybrush highlights with Cadmium Red. Emphasize wrinkles with floats of Cadmium Red. Shade hat with Rookwood Red + Lamp Black. Line tassel with Rookwood Red + Lamp Black, Rookwood Red, and then Cadmium Red.
-
Shirt and socks. Base with Yellow Ochre. Drybrush highlights with Buttermilk and brighten under the buttons with Light Buttermilk. Apply a first shading of Honey Brown — shading against both sides of the vest, down the front of the shirt (point of color facing the sign), against the cuff, in the sleeve wrinkles, and on the sock (up against pants and point of color against sock fold).
Deepen the shadows with Light Cinnamon, and then deepen the very darkest areas with Dark Chocolate. Create the texture on the socks with vertical lines of Light Cinnamon and Buttermilk.
Base the ties on the shirt with Rookwood Red. Highlight with a horizontal drybrush of Cadmium Red. Shade with Rookwood Red and Lamp Black. Base buttons with Midnite Blue and highlight with a float of Baby Blue.
-
Pants. Base pants with Light Cinnamon. Drybrush highlights with Honey Brown and brighten with Buttermilk. Shade pants under belt, under folds, between the legs, and outer edges of both legs with Dark Chocolate. Deepen shading with Lamp Black.
-
Vest. Base with Blue Haze. Drybrush a Blue Mist highlight vertically down the front of the vest. Float a Blue Mist highlight around the pocket and along the hem. Shade with floats of Blue Haze + Midnite Blue. Deepen shadows with Blue Haze + Midnite Blue + a touch of Lamp Black. Add decorative trim to vest with lines of Rookwood Red and dots of Cadmium Red, Yellow Ochre, and Sapphire.
-
Beard, hair, and eyebrows. Base with Buttermilk. Float Blue Mist shading under nose, under mustache, against sides of face, in the hair against the hat, a little in the eyebrows, and stroke some in the beard, following the hair growth direction. Highlight these areas with Light Buttermilk, and then strengthen highlights with Snow White.
-
Shoes, belt, and hammerhead. Base with Lamp Black. Drybrush with Light Cinnamon to tone the color a bit. Drybrush Neutral Grey highlights, and then add a little Buttermilk to brighten. Strengthen shadow areas with floats of Lamp Black.
-
Shoelaces. Using small S-strokes, base laces with Dark Chocolate, highlight with Yellow Ochre, and shade with Lamp Black.
-
Belt buckle, tin can, and nails. Base with Neutral Grey. Softly drybrush with Neutral Grey + Snow White + a touch of Light Cinnamon. Shade with Lamp Black and add a high shine with Snow White. To highlight the can, apply a flip-float down the center and softly mop horizontally to blend.
-
Paintbrushes in can. Base the paintbrush handle on the left with Blue Haze, shade with Midnite Blue, and highlight with Light Buttermilk.
Base brush handle on the right with Yellow Ochre, shade with Dark Chocolate, and highlight with Snow White. Base ferrules with Neutral Grey, highlight with Snow White, and shade with Lamp Black. Line bristles with Dark Chocolate, Light Cinnamon, and then Yellow Ochre. Float a shadow of Dark Chocolate on the bristles against the ferrule. Base paint puddle and paint drip on brush with Cadmium Red, shade with Rookwood Red, and highlight with Cadmium Red + a touch of Yellow Ochre.
-
Ruler. Base the ruler with Light Cinnamon. Drybrush a Yellow Ochre highlight down the center. Shade with Dark Chocolate. Line the numbers with Lamp Black.
-
Bluebirds. Base entire bird with Buttermilk. Shade tummy with Honey Brown + a touch of Cadmium Red, applying in a stroke-like manner to create feathers. Dab a Snow White highlight in the lower center. Ever so softly, shade the wings, head, and tail with Midnite Blue. Note: Midnite Blue is a transparent color, so if a darker value is desired, just float another layer. If needed, further deepen shading with Midnite Blue + a touch of Lamp Black, and highlight some feathers with Buttermilk. Add beak and toes with Honey Brown, shade with Light Cinnamon, and highlight with Buttermilk. Dot eyes with Lamp Black and apply a high shine with Buttermilk.

Rosemaled topper
-
Base blue scrolls with Blue Haze, highlight with Blue Mist, and shade with Midnite Blue.
-
Base red scrolls with Rookwood Red, highlight with Cadmium Red, and shade with Rookwood Red + Midnite Blue.
-
Stroke leaves with Avocado, highlight with Hauser Light Green, and shade with Black Green.
-
Stroke sides of flowers with a double-load of Honey Brown and Light Cinnamon, and stroke the middle petal with Yellow Ochre. Highlight the top of the center petal with Light Buttermilk. Stroke teardrops in the middle of the center petal with Light Buttermilk tipped in I Honey Brown.
-
Detailing. Apply stem lines and leaf comma strokes with Black Green and Hauser Light Green. Add decorative commas, teardrops, and lines with Midnite Blue, Rookwood Red, Avocado, Buttermilk, and Honey Brown, referring to the photo for positioning.
Finishing
-
Shade the bottom of the grass area with Black Green. Base the cut edges of both wood pieces with Black Green.
-
Erase any visible graphite lines. Let the paint cure for a couple of days. Varnish with several coats of satin varnish, allowing each coat to cure before applying the next.
-
Hang your sign outside (out of direct sunlight), and you can enjoy Arne for years to come.
Leave a Comment